Showing posts with label Deena. Show all posts

Saturday, January 9, 2016

And So The Adventure Begins


Hello, Deena on the blog today sharing a tutorial on how I created my card for the current challenge. 

This will be my last post at Off The Rails Scrapbooking because at the end of the month I will be leaving. For the last 2 and a bit years I have put my heart and soul into OTRS and I cannot thank Amanda enough for allowing me this opportunity. It was a hard descision to make and I did a lot of soul searching but for me it is the right one. I have worked with and been inspired by our amazing Design Team and I would like to also thank them for everything that they do. 

So moving along with my tutorial. I decided to create a tutorial on my card as I was having so much fun creating it and wanted to share.


When I first saw mood board I was a little bit stumped as I am not really a vintage girl but I loved all the inspiraion that it offered me. The part that really stood out was the combi vans. I just knew I had to use them some how.

1. I cut my mixed media paper to size 10.2 cm x 14.5. Using washi tape I stuck that to the back of my paper so it stayed in place on my desk while using a stencil and whipped spackle.


2. After drying with a heat gun just to make sure it was completly dry I then used my watercolour paints to creat the background. I first sprayed my card with water and then added watered down paint to it. I did this twice, making sure that I dried in between the applications.

3. I then added the twine and button to my background


4. For my combi van image I searched the internet until I found one that I was happy with. I then played with the size, I then printed on to smooth white cardstock, then fussy cut it out. Before attaching the van to the card base I used my faber-castell big brush pen to edge the van. I also did this to my mixed media paper before I attached it to the card base.

5. Found a title, also edged that with my big brush pen and attached it to my card

Products Used: mixed media paper, button, stampin' up twine, red watercolour paint, cobalt blue big brush pen, deep scarlet red big brush pen, whipped spackle, Dylusions by Dyan Reaveley Stencil - Arrows Small, Tim Holtz idea-ology small talk.

Friday, January 1, 2016

Happy New Year welcome to Januaray's New Challenge

Welcome to a new challenge Off the Rails creators and a Happy New Year!!

Where did 2015 go ??

This months moodboard is made up of a gorgeous vintage theme, please have fun with it  


Monday, November 16, 2015

1 Stamp 2 Cards


Hello All, Deena on the blog with you today.

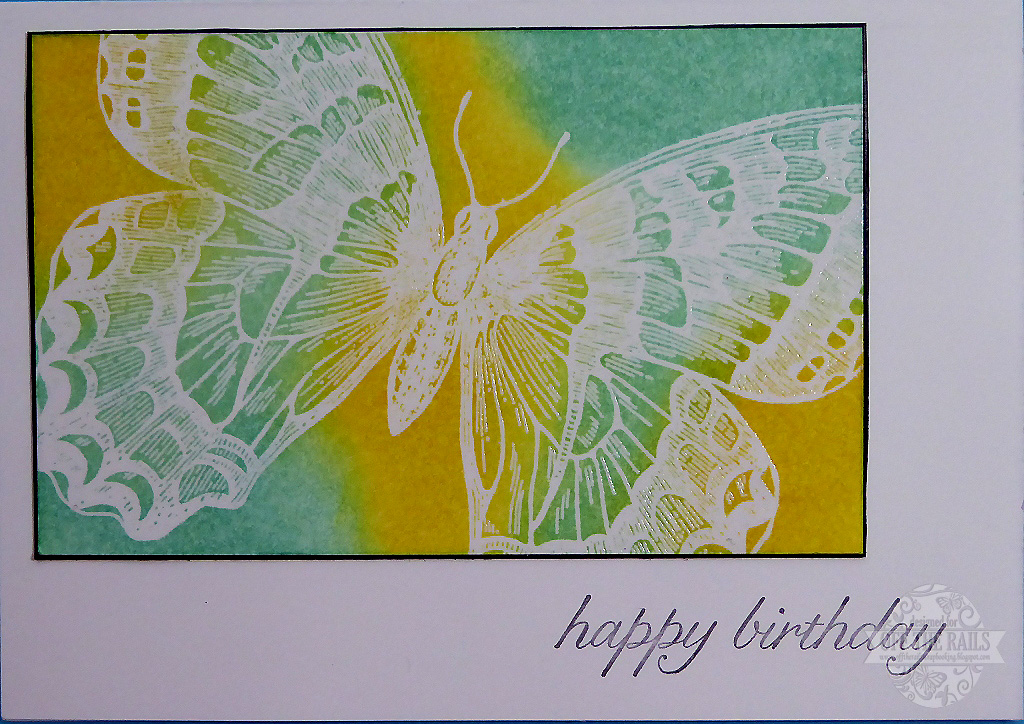
I love butterflies and I have a stamp from Stampin' Up called SwallowTail which I just love but haven't used much. So this month using the colours from our Mood Palette I have created 2 quick and easy cards with this stamp.

Below is our mood palette and I would love to see how you would use it.


All the Products I used are from Stampin' Up
Stamp - SwallowTail
Stamp - Butterfly Basics
Stamp Birthday Blossoms
Ink - Basic Black
Ink - Daffodil Delight
Ink - Soft Suede
Ink - Pool Party
Ink - Cucumber Crush
Cardstock - Whisper White
Cardstock - Basic Black
Re Inker - Cucumber Crush
Re Inker - Daffodil Delight
VersaMark
Clear Embossing Powder


Card Number 1
1. Cut cardstock to required size. Make sure that the cardstock is smaller than the image you plan on stamping.

2. Using VersaMark ink pad stamp image.

3. Embossing with clear embossing powder.

4. Using cut & dry stamp pad foam I inked my white cardstock with Pool Party and Daffodil Delight. The embossing acts as a resist. 


5. Mount image on black cardstock.

6. Attach to the left had corner of card base.

7. Stamp sentiment in lower right hand corner.


Card Number 2
1. Cut A4 cardstock in half to form the card.

2. For each colour of ink used I filled mister with a small amount of ink  then add water. 

3. Lay cardstock on a protected surface and spray.

4. Dry both sides of the cardstock.


5. Score cardstock to form the card base. Normally I would have done this after cutting the card base but I wanted the colour on the front and back.

6. Stamp Butterfly image and sentiment.

7. Flick card with the watered down ink.


Tuesday, September 29, 2015

Playing With Color Bloom Spray Mist

Hello All, it's Deena here with you today.

Just recently I finally gave in an brought the Color Bloom Spray Mists from Prima. My will had been strong until I put my name down for a class that is happening in November. In the class the sprays will be used. So me being me I needed to know what they were like and what they did and I thought I would share the outcomes with you all.

Products Used: Color Bloom Spray Mist -  Soft Teal, Brush Chrome, Deep Teal, Tangerine, Summer Sky and Cobalt. Mixed Media Paper, TCW Stencil - Mini HalfTone Circles, Clear Crackle Paste, Clear Gesso, Texture Paste, White Gesso, Matte Gel and Gloss Gel.

1. I applied clear crackle paste to the mixed media paper with a palette knife. I wanted different thinknesses of paste which I let to dry naturally. Letting it dry naturally usually produces better cracks. Once dry I sprayed it with the Soft Teal, which really didn't show up much so then with Soft Teal in one hand and Deep Teal in the other I spray them so that they would mix. I then dry them with my heat gun which resulted in this yummy background that I am sure will get used for a card at some stage.


2. To my mixed media paper I applied clear gesso with a brush. Clear Gesso really does not take long to dry at all. With the sprays it says that you can get splatters and all over coverage. To get the splatter result as seen below, you just don't squeeze the trigger as hard, makes perfect sense. Brush Chrome is the color used. 


3. I applied texture paste through my stencil, which I let dry naturally. I was in no rush to dry it immediately as my 2 children are on school holidays so I have been in and out of my art space during the day, catching a few minutes peace when I can. I sprayed the texture paste with deep teal and to be perfectly honest I did not expect an all over coverage, I did not think that it would stick to the texture paste. In fact I actually had too much and press the paper into my art journal so I now have the start of a new art journal background.


4. The background below was achieved by applying a layer of gesso with a palette knife that was dried with a heat gun and then spraying Tangerine. Not sure why the color is more intense in some places than in others as it was an all over coverage, but such a pretty result, it sort of reminds me a gem stone. I wonder what I will embellish this with?


5. This has to be my favourite back ground out of all the experiments that I did. It is a layer of matte gel applied with a palette knife to the mixed media paper. It was left to dry naturally. I then sprayed Summer Sky, this again was left to dry naturally. I did end up using my heat gun but only right at the end just to finish it off. 


6. My last medium I used was a Gloss Gel Medium. I didn't do an all over coverage again I played with the Cobalt splatters. Once the spray was dry I rubbed it with my finger which resulted in movement of the spray. The movement of the spray didn't surprise me as you can usually wipe away most paints and sprays from the Gloss Medium and as you can see in the last photo I wiped it as clean as I could get it.


Thank you for reading through my ramblings and I hope some of them were useful.

Wednesday, September 16, 2015

When Things Go Wrong


Hello All, Deena with you on the blog today.
I am sharing with you a tutorial and at one point, what I was creating went wrong. 

When you are creating we all have a tendency to compare ourselves with others, and I will put my hand up the quickest as I do it all the time. But you know what, we are all individuals, we all create differently and see things different. We are our own worst critic, well I am here to tell you to be gentle with yourselves and be who you want to be. Believe in the journey and trust where the path leads because you never know where you will end up or what you will discover.

Products Used
VersaMark Ink
Archival Ink - Jet Black
Clear Embossing Powder
Distress Powder - Tea Dye
Heidi Swapp Colour Shine - Teal
Art Extravagance Texture Paste - Clear Crackle
Clear Gesso
White Gesso
Dylusions Ink Spray - White Linen
Ken Oliver Crafts Color Burst - Pthalo Green
Derivan Spreader Medium
Derivan Matisse Flow Paint - Raw Umber
Hero Arts Stamp - Fabulous Flourish
Prima Cling Stamp - Don't Forget To Fly
Heidi Swapp Butterfly Stencil
Cut & Dry Foam
White Gelly Roll Pen


Step 1. Cover your page with white gesso, then mixed you paint with the spreader medium (I did it on my page). What the spreader medium does is not only extends the drying time to allow you to move the paint but it also makes it thinner and easier to use. Once dry I added over the top my crackle paste in and uneven layer. 

Let this dry naturally. That way it produces better crackle
 

Step 2: Spray your page with water and then sprinkle the Color Burst over the water and watch the magic happen. Add more water or colour burst as you want. You can either let it dry naturally or hit it with your heat gun.
I actually let mine dry over night as I think it was about midnight when I got to this stage. You can see the yummy crackly (best part of my page)

Step 3: I decided that the colour was way to strong I used my cut & dry foam to add white gesso and raw umber paint. Once I was happy with the look I dried it with my heat gun and then put a layer of clear gesso over the top.

Step 4: Using my Fabulous Flourish and VersaMark I stamped the design and then added my distress powder. Once my distress powder my cooled I then rub the design with my fingers to take away the loose pieces, to create the distress look.

Step 5: I stamped my image in archival ink and then clear heat embossed over the top. Archival Ink is not the best ink to heat emboss as it dries quickly but for what I was doing it wasn't a problem.

Now this is where things went wrong.
Step 6: Using my stencil I sprayed the colour shine and because it didn't work very well I decided to add white splatters to the mix. Oh boy what a mess. 

  
Step 7: Because earlier in the process I had added a layer of clear gesso I was able to remove the colour shine and white gesso with water and paper towel.

Step 8: Using my white gelly roll pen I add some highlights to the wording.

To be honest I am not entirely happy with what I created but I wanted to share my journey with you. The thing to remember is Don't Give Up.

Tuesday, September 1, 2015

Spring Has Sprung

Here in Australia it is the first day of Spring, we are yet to feel it in Melbourne but it is on it's way I am sure (and hoping). Because it is the first of the month that means we have a mood board challenge. It is moody, dramatic and the design team have done an amazing job with it.


We would like to welcome back 2Crafty Chipboard who are our sponsor this month. They are offering the lucky winner a mixture of their
 gorgeous chipboard. Who doesn't love chipboard.


Please Note our sponsors this month, 2Crafty, will post Australia-wide only.  International entrants, please note that if you enter, we have to assume that in the event you are chosen as a winner this month, you are prepared to pay the postage for your prize.

Thursday, July 16, 2015

Embrace The Journey


Hello All, Deena with you on the blog today.

My tutorial is a double page spread in my art journal.

Products Used
Art Journal
Masking Tape
Gesso
Dylusions Paint - Vibrant Turquoise
Dylusions Paint - Fresh Lime
Archival Ink - CornFlower Blue
Stencil - Prima: Ripped Fishnet
Stamp - Dylusions: Further Around The Edge
Quote - Tim Holtz idea-ology Small Talk


Step 1: Place masking tape down the centre of your journal this stops leaking on to other pages. I used a paint brush to cover the pages with white gesso.


Step 2: On my craft mat I put my two paints side by side and then I pick some of the paint up on scrapper and then applied it to my journal pages.


Step 3: Once the paint was dry (helped along with my heat gun) I then laid my stencil on each page and instead of adding to the pages I removed some of the paint with a baby wipe. If you don't have any baby wipes you can do it with a damp rag or paper towel.

Step 4: I decided that the paint was a bit brighter than I wanted it to be so I applied a very thin layer of gesso with my paint brush. Once the gesso was I sprayed my pages with water and started to dry the water. Before the water was completely dry using a piece of paper towel I mopped up some of the water which also removed some of the gesso.


Step 5: Using my stamp and ink pad I stamped images on both my pages. Then using the end of a plastic paint scrapper I just touched my gesso and then using it as I stamp I stamped lines to create the flowers.


Step 6: Stuck the wording on to my page.


Thank you for coming to visit and please don't forget to follow us on facebook 

Wednesday, July 1, 2015

July's Challenge

Welcome to the second half of the year, I am not too sure where the first half has gone but gone it has.

This month we are giving you the choice of two very different but gorgeous mood palettes.


Which one will you choose to be inspired by? Shall we see what our creative Design Team came up with?


Out for publication 


What an amazing array of work created. I am sure that you will find lots to inspire you.


This month we welcome back  Imaginarium Designs as our sponsor, thank you Imaginarium Designs.