Showing posts with label stamps. Show all posts

Monday, November 16, 2015

1 Stamp 2 Cards


Hello All, Deena on the blog with you today.

I love butterflies and I have a stamp from Stampin' Up called SwallowTail which I just love but haven't used much. So this month using the colours from our Mood Palette I have created 2 quick and easy cards with this stamp.

Below is our mood palette and I would love to see how you would use it.


All the Products I used are from Stampin' Up
Stamp - SwallowTail
Stamp - Butterfly Basics
Stamp Birthday Blossoms
Ink - Basic Black
Ink - Daffodil Delight
Ink - Soft Suede
Ink - Pool Party
Ink - Cucumber Crush
Cardstock - Whisper White
Cardstock - Basic Black
Re Inker - Cucumber Crush
Re Inker - Daffodil Delight
VersaMark
Clear Embossing Powder


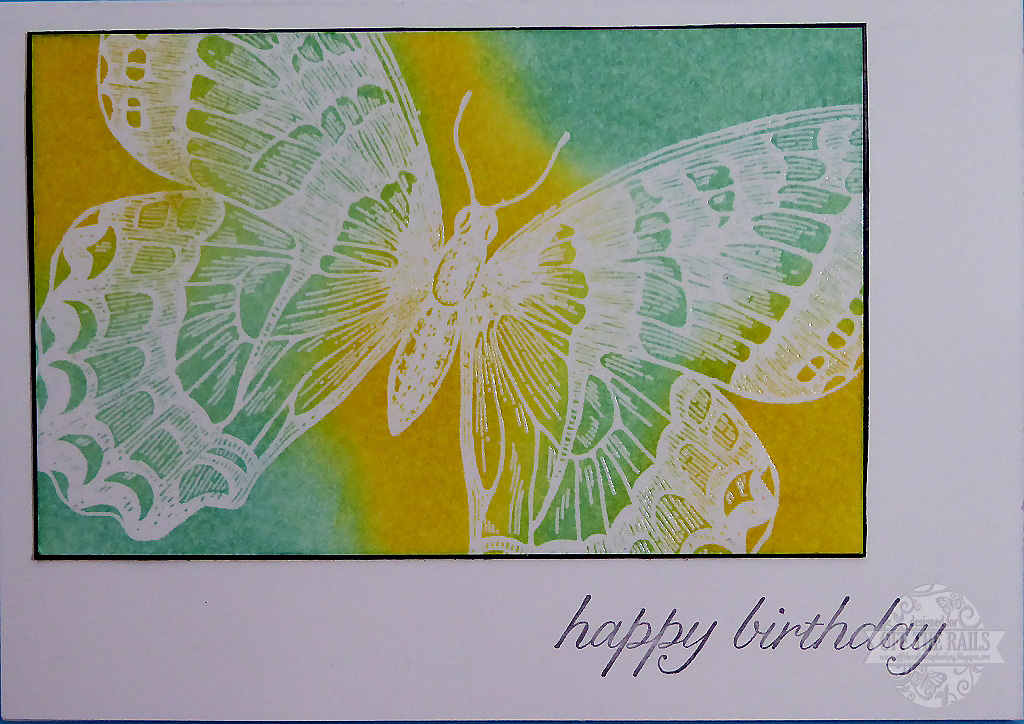
Card Number 1
1. Cut cardstock to required size. Make sure that the cardstock is smaller than the image you plan on stamping.

2. Using VersaMark ink pad stamp image.

3. Embossing with clear embossing powder.

4. Using cut & dry stamp pad foam I inked my white cardstock with Pool Party and Daffodil Delight. The embossing acts as a resist. 


5. Mount image on black cardstock.

6. Attach to the left had corner of card base.

7. Stamp sentiment in lower right hand corner.


Card Number 2
1. Cut A4 cardstock in half to form the card.

2. For each colour of ink used I filled mister with a small amount of ink  then add water. 

3. Lay cardstock on a protected surface and spray.

4. Dry both sides of the cardstock.


5. Score cardstock to form the card base. Normally I would have done this after cutting the card base but I wanted the colour on the front and back.

6. Stamp Butterfly image and sentiment.

7. Flick card with the watered down ink.


Saturday, October 31, 2015

LAWN FAWN!!!!!


Once again we would like to thank Lawn Fawn for sponsoring us. Kelly is such a gorgeous lady and is more then helpful, pop over there and have a look around their site.

Here are a few of their NEW products, get your hands on them, click on their photo to take you straight to that product.

 toboggan together 

happy harvest

pumpkin spice ink pad


Thank you 
again Lawn Fawn, we look forward to you to seeing again

Wednesday, June 4, 2014

Using Digital Overlays, Stamps and Stencils

We have Wendy sharing an exciting tutorial with you today
Just like in traditional scrapbooking, there are many ways to use digital stamps, stencils and overlays on your work. In this tutorial I will show you how to use some of these techniques on your layouts.
I have used Panstoria Artisan 4 to demonstrate the techniques but if you use Creative Memories Storybook Creator (particularly version 4), the steps involved are almost identical and will be easy to follow. If you use other programmes such as Photoshop or Photoshop Elements, the steps will not be identical but the tool icons are similar, you may just need to experiment a little to find the perfect tools for the job.
 1. Overlays
Using digital overlays to enhance your layout is very easy, you simply drop the overlay on your page (just like placing a transparent overlay on top of a traditional page).  Many digital art packages have overlays that you can use.  The following layout has a number of ready-made digital overlay layers. You can see the difference each layer makes to the page.


Here we start with a photo and some background paper.


I wanted to define the page so I used a grungy overlay to frame the layout. In this case, I used the overlay from the Creative Memories Downtown Kit. To do this, you can either right click then click on “add to page,” or you can drag and drop.


Then I added a globe overlay, the same way as the step above, but this time I had to move the layer back so it didn’t obscure the photo. I did this by right clicking the globe element and selecting “move back”. Once the overlay was behind the photo, I repositioned it till it was exactly where I wanted it.


I repeated the process again to add another overlay along the lines of the travel theme. At this stage we have one photo, one paper and three overlays, so you can see how the layers are building up with mostly ready-made overlays.

Finally, the addition of a photo frame and a title and the page is finished.

2.            Digital Stamps
Most digital programmes have a “stamp” or “stamping” command. This is how different I can make my page look by using the same photo but “stamping” instead of using overlays.


Here I have used the same photo that I used in the previous example but this time I’ve enlarged the photo to make it the background. At this stage there is nothing on the page except the photo.


In this step I have turned the background photo into a stamp by using the following commands, “Insert” and “Rubber stamp”.  You then have several options to get your stamp the way you like it by changing the colour and threshold. The small drop down screen automatically shows you the changes. The layout looks messy, and you can’t see the stamp properly, because the background photo still dominates.


For the stamp to look any good, you need to get rid of the background. When doing digital layouts the first layer or background is automatically locked and you need to unlock it in order to delete it. To the left of the above picture, you can see there are two layers – the background and the stamp. Clicking on the highlighted lock symbol will unlock the background then you can delete it.

Once the background is deleted, you are left with the stamp which is now your background. You can make stamps any size you want but I made mine large so that I can use it as my background paper. Now I can do anything I want with my background.


After adding my elements and embellishments I have a totally different layout using the same photo.

3.            Using the “Opacity” command to make a stamp
In the example above, the stamp doesn’t have 100% coverage, i.e. it has an uneven threshold (parts of the picture are missing, just like what happens when you use a small or uneven amount of ink on a traditional stamp). If you want full coverage and want every part of the picture to be visible, you can use the “opacity” command.


This is the same photo turned into a background, just like the example above but, instead of using the “stamp” command, I have changed the opacity of the photo. To do this I used the “Format” “Opacity” commands. The drop down box allows you to play with the levels of opacity – you can make it as heavy or faint as you like. My example is 57% capacity.


Here is the same layout as in 2 above but using the “opacity” command for the background rather than the “stamp” command. The background has a very different look when used this way.

 4.            Stenciling
Many digital art kits have stencils that you drop onto your layout in the same way as you do with overlays. There are also other ways you can create custom stencils.


This layout was done by just adding two stencil embellishments to the page.


Using the same photo, I have created two stencils with different looks. The top one was created using the following tools, “Format” “Filters” “Stylize” “Threshold”.

I created the bottom one using the tools, “Format” “Filters” “Stylize” “Canny edge”. The bottom one has parts of the photo missing like a stencil but it also looks like a drawing.
 Most digital programmes have many tools you can use to create the effect you are looking for, it just takes practice to work out what each tool or command does.

Thank you for taking the time to read this and I hope it inspires you to try some of the techniques.
Cheers
Wendy J

Wednesday, May 28, 2014

A peek in Lizzy's craft space

Yup! I know I LOVE taking a peek at other peep's craft areas...& there are ALWAYS ideas that we can pick up from each other, right? So here's a bit of both of these for you today:)
 I keep my 6x6 pads in a little box...inside a cut down plastic sleeve. Then even the 1/2 pages can be stored neatly without them falling out when I pull up a pad to use!

 I have a wee table near the door to 'show off' some of my work - or to place stuff I like to look at. No point in doing it if you can't enjoy it, right? It's also a storage spot for stuff that needs to be taken with me when I leave the room...just finished that page for a challenge & it needed to be loaded onto my computer! Ooops! That candle needs putting away...never said I was TIDY!!!

 Yeah, I know, I know---such a BASIC thing to do - a colour chart for your inks....& I kept 'meaning to do it'...finally did....pegged above my work space, so I USE it!!!

 To me, scrapping is about COMMUNITY, so when I get given scrummy stuff, I like to make sure I know where it comes from...also if I buy it...flair is hard to write on, but an ink marker works & I know where ALL my flair originates this way!!!!

 As for Flair storage....a couple of ways...above - magnetic strips from those dollar stores...I WILL make this 'pretty' at some stage, but I was testing if  it 'worked' for me...& it does - also hanging close by where I scrap..

 ...but I have too much flair, so the rest is stored in these babies....great for brads, buttons, resin, dots...

  I have a whole post on what I call my 'photo holder' over at LESSology HERE....suffice to say, I LOOOVE it....no more gluey, sticky, lost photos. They sit here SAFELY......

 My 'scraps' are colour co-ordinated & slip inside these files....easy. I now throw the really small bits out - unless I totally LOOOVE them!!


 Another 'nice' way of storing those smaller scrapping items - spice racks ROCK, as do these cute vintage glasses - all from the Op shop!! So is the little shelf they're sitting on. I'm going to do that up too, 'one day'....!!!

 Most of my stamps are clear, & most stored in baskets: Christmas/Birthday...vintage.....flowers......words.....Most Used...I'm sure you'll work out your own categories!!!!

 I pull out the centre from DOUBLE CD cases from the Dollar store - they MUST be double, & do this:

 Then I know exactly where they are from & when & what they look like at an easy glance!!!

And lastly, my Washi Tree - one of those old kitchen mug hanging trees...op shop again...I WILL do it up [cough] sometime......works for me!

Heavy on pics....hope this either helps, or is at least plain FUN to look at ......leave any ideas, hints, stuff you'd like to share as a comment...would love to read your ideas:):)
Happy Scrapping ~ Lizzy ♥♥♥