Showing posts with label embossing powder. Show all posts

Saturday, November 25, 2017

Embossing technique with Rosemary

Hi Crafters

It's Rosemary and today I am sharing share how I highlighted the shoe stamp on my Inspiration page.

I thought the shoe stamp was very "chic!"


Gather your supplies-


-Carabelle Studios Stamps - Girly 


                                  Altenew Crisp Embossing powder Pure White Opaque


                                  Anti static pillow
                                Versamark ink (or Embossing Ink)      
                                acrylic block
                                 heat tool

Wipe the part of the page where you want your stamp to be with your antistatic pillow- this stops the embossing powder sticking where you don't want it!

Place your stamp on the acrylic block, making sure it is not upside down or sideways!
apply Versamark ink
and stamp your page.


Then generously sprinkle the embossing paste over your stamped image


It is handy to have 2 biggish sheets of paper folded in half. 
lay them on top of each other, 

Tip excess embossing powder off your page onto the top folded paper.

Then you can gently fold that and pour the embossing paste back into the jar it came in!
This is a good way to prevent wastage of your embossing powder, though I invariably lose some of it!!
 If you get the some of the  powder where you don't want it you can very delicately flick it away with a fine paintbrush - but be careful you don't swipe the image itself and muck it all up !😞


Now all that is left is to use your heat tool to set the embossing powder


I'm loving the Altenew Crisp Embossing Powder as all you need to do is hold the heat tool over the powder for a few moments, move it across the image and you see it setting as you go!

 You don't need a lot of heat on the one spot for long and you don't need to wave the heating tool above it - just hold over the image and move across it!

Of course the usual techniques to stamping apply, such as getting an even spread of the Versa mark ink over the stamp, not leaving it too long before covering with the embossing powder, and not burning the paper underneath by holding the heat gun too long in the one spot.

If you haven't tried this technique before maybe practice a few times before you go straight to your scrapbook page!!

If you look at my page you can see I  used 49 and Market Gabi's Line stitch stamp as a border.
This time I used the Altenew crisp Embossing Powder Translucent Pearl and
 it gave me a lovely way  to frame  my page.

Thanks for visiting.

Rosemary


Monday, November 16, 2015

1 Stamp 2 Cards


Hello All, Deena on the blog with you today.

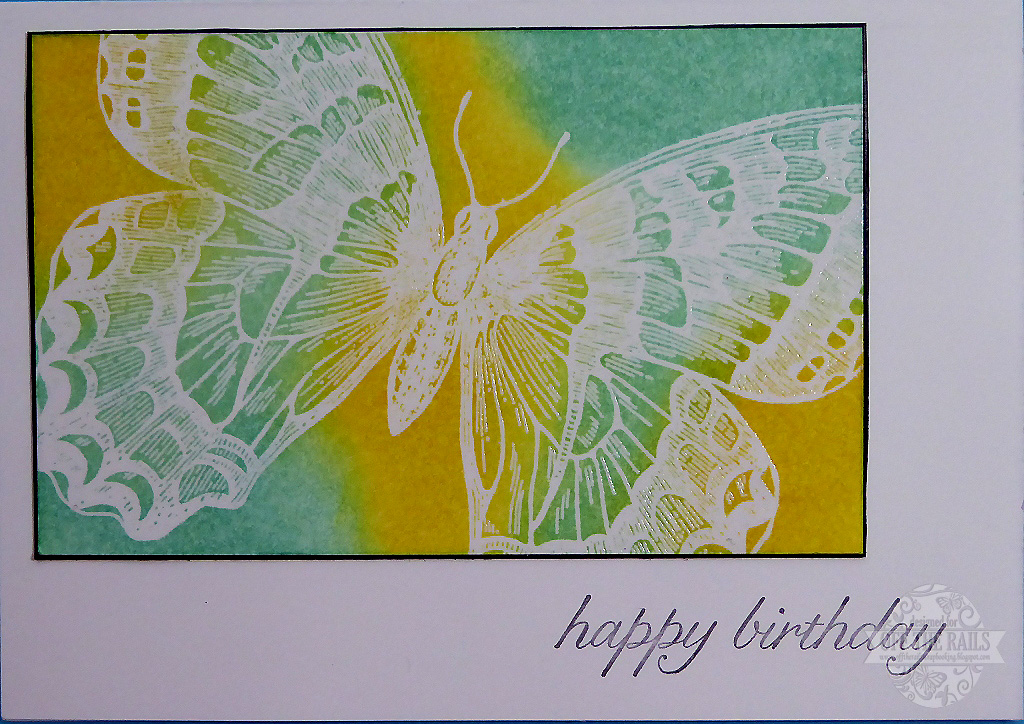
I love butterflies and I have a stamp from Stampin' Up called SwallowTail which I just love but haven't used much. So this month using the colours from our Mood Palette I have created 2 quick and easy cards with this stamp.

Below is our mood palette and I would love to see how you would use it.


All the Products I used are from Stampin' Up
Stamp - SwallowTail
Stamp - Butterfly Basics
Stamp Birthday Blossoms
Ink - Basic Black
Ink - Daffodil Delight
Ink - Soft Suede
Ink - Pool Party
Ink - Cucumber Crush
Cardstock - Whisper White
Cardstock - Basic Black
Re Inker - Cucumber Crush
Re Inker - Daffodil Delight
VersaMark
Clear Embossing Powder


Card Number 1
1. Cut cardstock to required size. Make sure that the cardstock is smaller than the image you plan on stamping.

2. Using VersaMark ink pad stamp image.

3. Embossing with clear embossing powder.

4. Using cut & dry stamp pad foam I inked my white cardstock with Pool Party and Daffodil Delight. The embossing acts as a resist. 


5. Mount image on black cardstock.

6. Attach to the left had corner of card base.

7. Stamp sentiment in lower right hand corner.


Card Number 2
1. Cut A4 cardstock in half to form the card.

2. For each colour of ink used I filled mister with a small amount of ink  then add water. 

3. Lay cardstock on a protected surface and spray.

4. Dry both sides of the cardstock.


5. Score cardstock to form the card base. Normally I would have done this after cutting the card base but I wanted the colour on the front and back.

6. Stamp Butterfly image and sentiment.

7. Flick card with the watered down ink.


Monday, August 3, 2015

Swallowtail Bleaching Technique

Hi everyone it's Narelle here to share with you a fun technique.

A few days ago you would of seen my page for the August mood board and sketch. On that page I had two large black butterflies which were a lovely lemon colour. I created those butterflies using bleach. Here is a reminder of the page.

Narelle Fasulo - Independent Stampin' Up! Demonstrator


I quite simply just coloured the butterflies with bleach. Here's how you can do it too.

First, rub the surface of the card stock with your embossing buddy. This will remove the static and make sure that the embossing powder does not stick to where we don't want it.


Then you stamp the Swallowtail onto the card stock using Versamark. Versamark is a clear ink which stays wet longer giving you the time to add embossing powder without the image drying.


Now sprinkle your embossing powder over the stamped image. Make sure you get a good coverage. Tip off the excess. If you have some powder stuck in the intricate parts of the design where you don't want it, just flick the back of the card stock and it should come off.


To set the powder and create the glossy look you need to melt the powder using a heat source. I used the Heat Tool which is fast and effective. But a word of warning here, even though heat guns look a bit like hair dryers, they are way more hotter and will easily burn. So please be careful. And you can't use a hair dryer for this as it will blow the powder away as they normally have a much more powerful fan.


As you heat the embossing powder it will start to melt and go glossy. Heat the image in sections until all the powder has melted.


Now fill an aqua painter with bleach. I just used the household cleaning variety of bleach. Please fill your aqua painter in a well ventilated room and its probably best to use gloves. Make sure you mark your aqua painter so you don't accidentally pick up the bleach one when you want to water colour in the future.


Now just paint over the image and you will see the magic happen. I have used Basic Grey card stock which turns a lovely lemon when bleached. As the card stock dries the colour will show more. For the best effect, colour the image then let it dry. If you want more colour to show, then just keep repeating the process.


Every card stock will react differently and give different colours when bleached. So have a play with different colours to see what effects you can get. It is a really fun technique that is easy to do.

I hope you try it soon.

Thanks for dropping by.
Have a great day.
Cheers,
Narelle

Monday, April 6, 2015

Using A Product That Has Been Forgotten

Hello All, Deena here with you today. 


For this tutorial I decided that I was going to use something that I had not used in a while so the first thing I did was look around my creative space to see what I could find. My distress inks, that's what I found. 

To be perfectly honest I cannot remember the last time I used them. When I first got them, I needed them and after my first use couldn't wait to buy more. Today I am going to use three of them. Vintage Photo, Aged Mahogany and Walnut Stain.

Other products used are:

Mixed Media Paper
White White Embossing Powder

Gold Embossing Powder
VersaMark
Kaisercraft Rub-Ons
Rhinestones

Texture Paste
Black Big Brush Pen
Stencil
Butterfly Punches

Step 1: Choose any of your stencils - I used one from The Crafters Workshop, Mini Labyrinth (6x6), I placed it on my mixed media paper and then scrapped texture paste through the design. Once I removed the stencil I dried it with my heat gun. Just before it was complete dry I used my scrapper to just distress the design so it wasn't so perfect and the edges weren't so sharp.


Step 2: Choose the inks that you are going to use. Remember that some colours mixed together just don't look great. I used Vintage photo, Walnut Stain and Aged Mahogany. Although they are 3 browns that are all very distinct and combine together to make a wonderful distress coloured background. Before moving on I sprayed my work with a Matt Spray from X-Press It. The reason i did this was because the distress inks move whether you touch them or spray water. I didn't want that to happen.

Step 3: Choose a background stamp and stamp it in three different place on your surface with VersaMark, then i covered it with gold embossing powder and heat set it. I love the combination of gold on brown it stands out so well.

Step 4: Choose another background stamp, this time I used one of the circle stamps from Prima. I wanted to add depth to my card so this time I used white embossing powder. It doesn't matter if the stamp isn't perfect that's the fun of creating this type of card.

Step 5: Sorting through my rub-on, I found one that had been around for awhile so when I went to remove it from the protective coating a little bit of it got left behind. This didn't worry me because I knew that I was planning on removing some of it once, it was on my card. With my black big brush pen I went around the edge of my card.

Step 6: Adding my embellishments. The cards I have been making recently have all been about the backgrounds with the embellishments enhancing it. So all I have used here, are some sticky back rhinestones and 3 butterflies that I cut out with two different butterfly punches.

Below are a couple of close ups of the texture that was created and to show you that my rub-on was missing some bits.


Happy Creating.

Monday, March 16, 2015

Magicals, Embossing Powder and Your Imagination

Hello All, Deena here on the blog with you today.

What can you create with Lindy's Stamp Gang Magicals, embossing powder and your imagination? Anything you want, but I have created a mixed media card tutorial.

Items Required:
Mixed media paper
Cardstock (to make the card)
Stencil (choose any stencil)
Lindy's Stamp Gang Magicals
Embossing powder
Paint Brush x 2
Palette Knife
VersaMark Ink
Texture Paste
and
Your Imagination


Step 1: Cut your mixed media paper to the size that you require.

Step 2: Lay your stencil over the paper and then use your texture paste to create dimension on your card.


Step 3: Once the texture paste is dry decide which colour/s of Magicals you are going to use. I had planned on using two colours but in the end only used Tilt-a-Wheel Teal from the Under the Boardwalk Collection.

Because the magicals are a power I did not want too much on the card so I dipped a dry paint brush into the magical pot and then tapped the brush on my finger to sprinkle the fine powder. I then added water (not too much as you can always add more) and watched the magic happen.


Step 4: Emboss your card. I used a different method to add VersaMark ink to my card. I used a paint brush. Looking back I think I needed to use a smaller paint brush as I have lost some of the amazing colour I created with the magicals.


Step 5: Stick the mixed media paper to your card base. I used X-Press It TripleTac Glue as it has a very strong hold and it only takes a couple of minutes to dry. I applied the glue all over the back of the mixed media paper with a palette knife. Once the glue is dry embellish the card.  I only wanted a very simple card because for me the background is the main focal point of the card


Happy Creating

Thursday, December 4, 2014

Lizzy introduces us to "UTEE"

Hey there! Do you know Utee? Nope, it's not a person! It stands for Ultra Thick Embossing Enamel....& it's just that. It comes in a range of colours, but I only have the clear one. I really like the thick, glossy effect it gives when heat set. 
Here's how I used it for a simple Chrissy tag, using up some BUTTONS.
 The crystals are MUCH coarser than 'normal' heat embossing powders & you're best to heat set from UNDERNEATH so they don't blow off everywhere!
Above is a sample, but for this tag, I mixed some normal Gold embossing powder in with the UTEE, to get the effect below:
 I used a damp piece of old foam spritzed with Heidi's spray colours to colour the manila tag [which was also lightly dampened with water]...
these are the TRUE colors, below...
 ...for some reason, the rest of the photos turned out wishy-washy colour wise....??? Who KNOWS!!!
Poked the holes through when I popped my buttons into the places they looked 'right'...
  My trickster way of attaching threads! I mean....knots to tie thread? That would be, like, waaay too hard for this sewer-hater! Besides, this was heading to being attached to the front of a card, so no-one will see the back.
IF it's going to be a 'stand alone' tag, then you just need to thread the button first, tie a knot behind the button, & then use a hot glue gun or strong PVA glue to attach to your tag. Or not even USE thread. They look nice just as they are, too:)
 A bit of diagonal washi tape for pop.....& it's finished. Simple, neat, easy, effective AND a stash buster for a few more of those buttons!!!! Hope this inspires your creativity in one way or t'other...
...& can I just wish you, one and all, a most amazing, wonderful, joyful, peaceful, fun & happy Christmas....
BLESSINGS to each & everyone one of you out there ~ Lizzy ♥♥♥