Showing posts with label washi tape. Show all posts

Friday, March 2, 2018

March Moodboard - Art Journal tutorial video with Louise

Hi Crafters

Louise with you today.

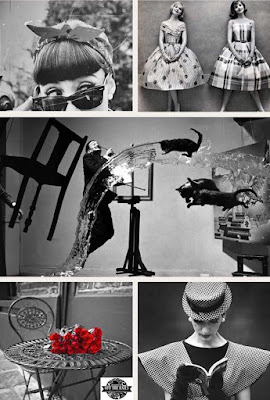
This month's inspiration moodboard is all about Monochrome + colour.


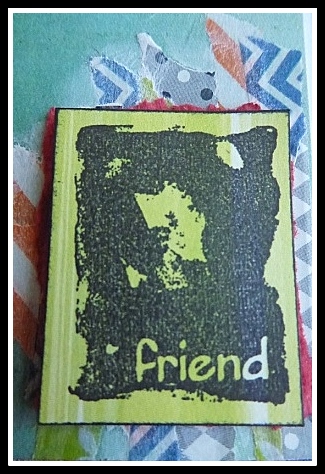
I decided to create a page in my Art Journal.


I am really new to Art Journalling and decided to give it a go after seeing some creations by

Selena makes some amazing mixed media pieces.


I consider my Art Journal as a place to "Create" without the pressure to record a memory or use a photo.
I really have enjoyed my recent exploration of a totally different genre of craft.


So today for my tutorial,
I'm giving you a look into my Art Journal so far
and a simple technique video if you'd like to get started.

By the way, if your scared that an "Art Journal" has to be all about Art ...
don't worry that's how I felt, but really it is just another creative outlet and you can do whatever you please.

Here is the video


Thanks for visiting.
I always love to hear comments on my projects ...
but also on my thoughts and ramblings,
so please feel free to leave some love.

Happy Crafting.


Thursday, March 9, 2017

Scrapbook layout tutorial with Candy

Welcome again to another month

My layout today is made from a kit I bought from Kitaholics.
And yes the photo is off my grand daughter Zarna Rose.


The heart was printed on the pattern paper.
So I cut it out carefully with a craft knife. I used a needle and
carefully poked some holes around the heart design, 
Then hand sewed around the heart with the twine.
I also added some thin gold washi tape. 
I cut a piece of cardstock and taped it to the back of the background piece to fill the heart hole shape.
Using foam tape, tape the heart to the background. 


I have added flowers, papers and embellies to the layout and also went around using my 
finger with gold paint and then added some black ink to the edges as well.


Products used

White cardstock
Simple Stories Love and Adore collection papers
Pink and white twine
Thin gold washi tape
Black ink pad
White doily
Chipboard frame
Kaisercraft gold paint
Prima flowers
Wood veneers
Flair button
Puffy stickers

Thank you for visiting

Candy Chelepy
2017 design team


Monday, January 25, 2016

Friend

Today we have the talented Sandi on the blog sharing a tutorial on card making.

Making cards is an great opportunity to practice techniques and experiment with a range of product and at the end you have a special and unique card to give to your friends and family. Here is a quick card that I made within half an hour with a technique my amazing scrapbooking and camping buddy Fiona Paltridge showed me in a layout workshop early last year. I love taking any opportunity to attend workshops and events where I can learn and be inspired by fellow scrapbooking and card makers.

This is my take on the Off The Rails Scrapbooking January Challenge Mood Board and I would also like to take the opportunity to thank Narelle from Simply Stamping for sponsoring this month challenge. I didn't get a chance to order any any up to date Stampin' Up stamps but I did have some that I had purchased a while ago so jump over to Narelle's website and see the amazing new products she has available to purchase, I know I will be getting some soon.

www.offtherailsscrapbooking.blogspot.com.au
Off The Rail Scrapbooking January Mood Board

January Challenge Sponsor.


Items used include:
  • 1 piece White 'Card' stock
  • 1pc of scrap white card to stamp onto.
  • Stampin'Up 'Friend' stamp from 'Looks like Spring' set.
  • 'Enjoy the Little Things' 12"x 12" paper
  • Deep red card- small piece to be torn to back Friend stamp.
  • Ranger 'Glossy Accents'
  • A range of washi tapes in different colour and patterns
  • White gesso
  • IndigoBlu 'Ink splat' stamp set 
  • Black StazOn Ink
  • Black leather strapping
  • Coloured beads
  • Large Pattern Button.
  • Wet Ones 
  • Magic mount from Kazass, if you haven't go Magic Mount small pieces of cardboard from a box will do the same thing.


Step 1. Fold card stock in half and crease edge to make lay flat.

Step 2. Cut a piece from the 12"x12" paper to fit onto the front of the card leaving a small white border.


Step 3. Choose a colour washi tape and begin tearing strips of washi tape off the roll, continue to tear each piece into thinner strips and lay onto one of the long edges of the card in random places, overlapping the pieces, repeat this technique in a small area on the bottom right hand corner.  Repeat this with the other colours and patterned washi tape until you are happy with the effect.


Step 4. Placing small amounts of white gesso on your finger, smear the gesso over the tape and just over the tape edge in a gentle rubbing motion. Using a wet one wipe off excess and in areas that you want to see the patterns and colours more and to soften the edge of tape where it joins with the paper. Do each of the areas separately to ensure the gesso doesn't dry too much.


Step 5. As it dries you can  stamp the 'Friend' stamp onto the scrap white card stock with Black Staz On ink and cut it out.

Step 6. Tear a piece of red card to fit behind the stamp, place a magic mount behind cut out stamp and stick to red card.

Step 7. Thread the beads and button onto the strapping.

Step 8. Using Black Staz On ink and 'ink splat' stamp, stamp your splats where you think they would look the best to balance the look of your card.


Step 9. Glue on your bead/button strap with a strong glue like 'Glossy Accents'. I placed some magic mount under my button to hold it in the place and flat. And glue 'Friend' stack down onto the small tape area.


Step 10. Edge the card with Black Staz On Ink to finish the card.


Here are some closeups for you:


Hope you enjoyed this tutorial and pop over to the Off The Rails Scrapbooking page to check out more pieces that will inspire you to have a go at scrapbooking, card making and hopefully to enter our latest and future challenges.

Friday, February 6, 2015

DIY - Washi Tape

Hi Lynn here with you today.

Last month I kicked the tires on making your own enamel dots.
I loved doing that and decided that maybe I'd
test drive making your own washi tape.
Again - there are a bunch of tutorials out there and I thought I'd narrow it down.

You'll need parchment paper and I used a 1 inch roll of masking tape.
I did  pick out some paints and stamps and then decided to change things up a bit.
 Lay out strips on your parchment paper - which allows you to remove
the finished product without losing the sticky.
 I used a craft smart mustard yellow enamel paint and slapped it on the tape end-to-end.
 The next I wanted to try a Ranger dauber - green - but all it says on the label is earthtones.
 I also tried an ink pad - that has chalk in it.
  It does take the chalk ink a bit longer to dry.
 And depending how much color you want you have to dab a few extra times.
 Since there was a lot going on I decided that StazOn ink would be best.
 I'm not the greatest stamper in the world - but I really liked the outcome on each.
 I liked the swirly texture from the dauber and used another chalk ink-Studio G 
to stamp the adorable "prima looking" flower stamp from Studio G.
 So far so good.
 Went back to StazOn because I wasn't sure of chalk ink on chalk in.
And the stamp is from Creative Cafe. A total blast from the past.
 And wa-la used the heat gun to get them dry and left them under the lamp for good measure.
As you can see the "washi" tape lifts right up.
 I used pincher clothes pins to wrap the "washi" around.
You are good to go as long as the front and back don't meet. 
So wrap the first little bit around one of the pins.
 From there you can wrap around both pins and it won't hurt the "washi"
doing that. It pulls off rather nicely and rips off easy.
There you have it - 3 varieties of "washi" of which I used one for a page.
Guess?
 The green worked out so perfect on this page.
Blending in nicely with the watercolors and embellishments.
 Used it in 3 places and love how it turned out.
 Can't see much of the flower but it works.
The finished product.
I'm not concerned about the tape per se, as I kept it from the photo.
Also I really don't get overly concerned anymore about items not acid and lingen free.
I found a scrapbook my mom made back in high school with
all the things they tell you NOT to use - and after 60 years it was practically
pristine. It was kept in a cedar lined chest for some time but,
I have been a rebel for about 12 years and never had issues with using
shall we say, non sanctioned scrapbook supplies.

Paper Studio, Kaiser Craft and Bo bunny papers.

Sunday, January 18, 2015

Wendy's Simple Washi Envelopes

Hello Lovely Scrappers. I hope you're all enjoying the start to the new year.
It's Wendy here today to show you how to make some simple, decorative envelopes using your Washi tape.
Making envelopes is certainly not a unique idea, and I can't claim credit for being the first to do it, but I always use a couple of very simple techniques that I want to pass on to you. When I make cards I often don't have the right size envelopes for them but I've always got plenty of paper and Washi tape that I can use. And, if you're like most paper crafters, you will too.
This first envelope is made from a piece of good quality copy paper.
Here is a different, even simpler, envelope.
I've made these envelopes using A4 paper for easy demonstration but, of course, you can make them any size you want by using the same techniques.
And for those people who are organised and always have the right size envelopes, you can use your Washi tape to pretty them up. Here is a ready made envelope I decorated.
I hope you found my tips practical and, until next time, happy scrapping :)

Saturday, November 15, 2014

DIY Decorative Tapes - with Sue


Hi everyone! It's Sue Plumb here with you today.

As everyone is probably aware, decorative tapes such as washi tape, are still a very popular trend in papercraft. Today I am going to show you how easy it is to make your own version of decorative tape that can be used for papercraft, gift wrapping, decor items, etc.
You will need the following items:
- tissue paper
- double sided tape
- scissors
- craft knife
- ruler


Start by cutting a strip of the tissue paper and laying it design side down. Peel the backing from one side of the tape and adhere over the top.


Then, use your ruler & craft knife to trim the excess from the tape. (Remember to leave the backing in place until you are ready to use it.)


To store it, I simply roll the strips up and secure with a paperclip. I like to attach a little piece of matching tape on the end as a tag and then I keep them in a small basket.


Here are a few I prepared...


How you use your tape is limited only by your imagination. Just remember that as it is stronger than regular washi tape, you will need to cut rather than tear it. Besides tissue paper, you could also try using paper napkins or fabric.


Have fun!!! :)