Showing posts with label Sandi. Show all posts

Monday, May 23, 2016

It's hard to believe it's been nearly two years since my daughters dream to dance overseas came true. To make it even better my mum and dad and myself traveled over to Basel Switzerland to watch her dance as a part of the OzScot Australia team and we were lucky to share in her excitement and as well her 20th birthday. It was an amazing holiday and a chance to share in this amazing journey of Bec's. 


Off The Rails Scrapbooking May Challenge.


I used the following supplies to create my layout
  • 12"x12" White Bazzil Card stock 
  • Memory Maze chipboard 'Fancy Boarder' & the Arrow from the 'Sunshine word set' & words Friends and Together from the 'Together word sheet'
  • The word 'Dance' from Kaisercraft 'Pop Collection' page. 
  • Black card stock for backing the photo and word 'Dance'
  • Kaisercraft 6 1/2"x 6 1/2" paper pad 'Enchanted Garden'
  • Bella 'Die cut'  Pack 
  • 'Blue London' Dylusions Ink Spray
  • Black gesso and water in an empty glue bottle with fine tip
  • Dimensional Magic.
  • Wire thread- white and black
  • Acrylic paint 'Semco'- black, Phthalo Blue and Ultramarine.
  • StazOn Ink- Black
  • Black ink


  • I first chose the chipboard pieces, the photo and die cuts I thought fitted with the theme I wanted to use; really hard when you have so many fantastic Memory Maze Chipboard pieces.
  • I experimented with placement of pieces and thought of different techniques and colours I could use.

  •  Using the Black StazOn Ink I edged all of my die cut and 'Dance' pieces. 
  • I glued my photo onto my chosen backings and edged the final piece with StazOn Black

  • Using black acrylic paint I painted the large chipboard piece and the word 'Together'. I then mixed the blue paints together until I was happy with the colour I needed to paint the word 'Friends'. The arrow was painted half with black and the other with the blue paint.

  •  When the paint was dry I used the Dimensional Magic over the top of the words and arrow to produce a gloss 3D effect.
  •  I placed a piece of cardboard (The cardboard in the packaging of the large chipboard piece) on to my paper to protect my white space and leave approx 1/3 of my page to apply ink to. Using a small spray bottle filled with water I sprayed the exposed section of paper  and then sprayed some water onto a piece of the plastic wrapping from the packaging of the chipboard. 


  • Next I sprayed 'Blue London' Dylusions Ink onto the plastic over the previously sprayed water .
  • When I thought I had enough on the plastic I flipped it over and placed it onto the paper, I continued to do this until I was happy with the coverage and effect. (Glad I had that piece of card down as I dropped a big blob of ink onto it, oops too much ink and water that time) 

  •  When the ink was dry, I used some of my Black Gesso mix I had mixed for a recently layout I'd completed. The mix consists of Black gesso and water mixed into a small empty glue bottle with a fine tip. I slowly moved the tip above the blue edge as I squeezed the bottle gently to get the mix to smoothly move out along the paint edge.
  • When the gesso dried I began to complete the layout by placing on the elements I had already prepared; chipboard, die cuts and words.
  • Finally I added a few splats of 'Black' ink and 'Blue London' ink to finish off the background and 2 circles of wire thread over the photo to complete the layout.


Here are some close-ups for you all to checkout:


Thanks for dropping by, I hope my tutorial has inspired your creativity and that you come by our Off The Rails Scrapbooking Blog and give our challenges a try. I look forward to seeing your artwork. 

Monday, January 25, 2016

Friend

Today we have the talented Sandi on the blog sharing a tutorial on card making.

Making cards is an great opportunity to practice techniques and experiment with a range of product and at the end you have a special and unique card to give to your friends and family. Here is a quick card that I made within half an hour with a technique my amazing scrapbooking and camping buddy Fiona Paltridge showed me in a layout workshop early last year. I love taking any opportunity to attend workshops and events where I can learn and be inspired by fellow scrapbooking and card makers.

This is my take on the Off The Rails Scrapbooking January Challenge Mood Board and I would also like to take the opportunity to thank Narelle from Simply Stamping for sponsoring this month challenge. I didn't get a chance to order any any up to date Stampin' Up stamps but I did have some that I had purchased a while ago so jump over to Narelle's website and see the amazing new products she has available to purchase, I know I will be getting some soon.

www.offtherailsscrapbooking.blogspot.com.au
Off The Rail Scrapbooking January Mood Board

January Challenge Sponsor.


Items used include:
  • 1 piece White 'Card' stock
  • 1pc of scrap white card to stamp onto.
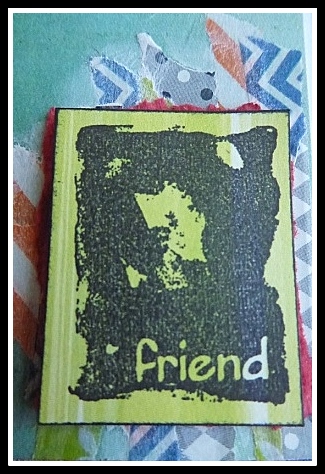
  • Stampin'Up 'Friend' stamp from 'Looks like Spring' set.
  • 'Enjoy the Little Things' 12"x 12" paper
  • Deep red card- small piece to be torn to back Friend stamp.
  • Ranger 'Glossy Accents'
  • A range of washi tapes in different colour and patterns
  • White gesso
  • IndigoBlu 'Ink splat' stamp set 
  • Black StazOn Ink
  • Black leather strapping
  • Coloured beads
  • Large Pattern Button.
  • Wet Ones 
  • Magic mount from Kazass, if you haven't go Magic Mount small pieces of cardboard from a box will do the same thing.


Step 1. Fold card stock in half and crease edge to make lay flat.

Step 2. Cut a piece from the 12"x12" paper to fit onto the front of the card leaving a small white border.


Step 3. Choose a colour washi tape and begin tearing strips of washi tape off the roll, continue to tear each piece into thinner strips and lay onto one of the long edges of the card in random places, overlapping the pieces, repeat this technique in a small area on the bottom right hand corner.  Repeat this with the other colours and patterned washi tape until you are happy with the effect.


Step 4. Placing small amounts of white gesso on your finger, smear the gesso over the tape and just over the tape edge in a gentle rubbing motion. Using a wet one wipe off excess and in areas that you want to see the patterns and colours more and to soften the edge of tape where it joins with the paper. Do each of the areas separately to ensure the gesso doesn't dry too much.


Step 5. As it dries you can  stamp the 'Friend' stamp onto the scrap white card stock with Black Staz On ink and cut it out.

Step 6. Tear a piece of red card to fit behind the stamp, place a magic mount behind cut out stamp and stick to red card.

Step 7. Thread the beads and button onto the strapping.

Step 8. Using Black Staz On ink and 'ink splat' stamp, stamp your splats where you think they would look the best to balance the look of your card.


Step 9. Glue on your bead/button strap with a strong glue like 'Glossy Accents'. I placed some magic mount under my button to hold it in the place and flat. And glue 'Friend' stack down onto the small tape area.


Step 10. Edge the card with Black Staz On Ink to finish the card.


Here are some closeups for you:


Hope you enjoyed this tutorial and pop over to the Off The Rails Scrapbooking page to check out more pieces that will inspire you to have a go at scrapbooking, card making and hopefully to enter our latest and future challenges.

Friday, January 15, 2016

January 2016 Mid Month Reveal

Welcome to the Mid Month reveal. 
Here is a sneek peak of Luciana's layout please come back on the 17th to see the full layout and tutorial


Dont forget about our sponsor this month 

Sunday, November 15, 2015

November's Mid Month Reveal

Are you having fun with our Mood Palette this month? It is all about recycling.


Shall we have a look at what the design team have created?


 Tanya


Dont forget to follow us here and also on facebook.