Showing posts with label Digital Scrapbooking. Show all posts

Sunday, December 20, 2015

SIMPLE HYBRID CHRISTMAS CARD


Hi, 
it’s Wendy here today to share with you how I made a quick, simple hybrid (combined digital and traditional) Christmas card.


I used this month’s “traditional colours” mood board as inspiration for my card.


First I designed the white panel on the front of the card digitally using some favourite Christmas elements. You could use any pictures on the panel, or even a written quote. I then printed out my design twice on white card stock.


I cut out the first panel and stuck it in position on my cardstock base. My base is 22cm x 15cm, scored in the centre so that the folded card measures 11cm x 15cm. You can make the card any size you want but I made mine this size because it fits in a standard size envelope easily.
The second panel print I used to make some 3D embellishments. I cut out the “HO HO HO” banner, Christmas stocking and the gnome – all very straight forward cutting. I then used foam dots to adhere these embellishments in place over the base. This is what it looks like in 3D.
As you can see, I have also added some traditional embellishments in the way of sparkly gold stars and red bling dots.
Hope I’ve given you some ideas and thanks so much for dropping by.
Cheers.

Sunday, November 1, 2015

Recycle or Upcylce November Challenge

Welcome to November, this month not only do we have one of our fantastic mood boards to inspire you with, but also we want you to either recycle or upcycle something. Do you have a cereal box just about to be thrown in the trash or an old card or even some advertising material from your mail box? Maybe you have a background from a layout, a card or a mixed media canvas that you started but you only got so far before you decided that it wasn't heading in the direction you want. Now is the time to use these things and do what the name of our blog suggestions go Off The Rails and create something that you never dreamed of creating. 


Is the mood board giving you lots of ideas? Lets get those thoughts and idea flowing even more and see what the Design Team from created.


Sue


Sneak Peek come back on the 24th to see the whole design


This month we welcome back Imaginarium Designs as our monthly sponsor.


Tuesday, September 1, 2015

Spring Has Sprung

Here in Australia it is the first day of Spring, we are yet to feel it in Melbourne but it is on it's way I am sure (and hoping). Because it is the first of the month that means we have a mood board challenge. It is moody, dramatic and the design team have done an amazing job with it.


We would like to welcome back 2Crafty Chipboard who are our sponsor this month. They are offering the lucky winner a mixture of their
 gorgeous chipboard. Who doesn't love chipboard.


Please Note our sponsors this month, 2Crafty, will post Australia-wide only.  International entrants, please note that if you enter, we have to assume that in the event you are chosen as a winner this month, you are prepared to pay the postage for your prize.

Saturday, July 18, 2015

Digital Mixed Media Layout

Digital Mixed Media Layout
Hello Scrapbooking friends,
It's Wendy here today to show you how to create a digital mixed media layout. It's all a matter of building up the layers, just like you would with a traditional layout.
Earlier in the month I did a layout based on the first inspirational mood board. Because both mood boards are so delicious, I decided to base my tutorial on the second one. Just to refresh your memory, this is the second mood board:

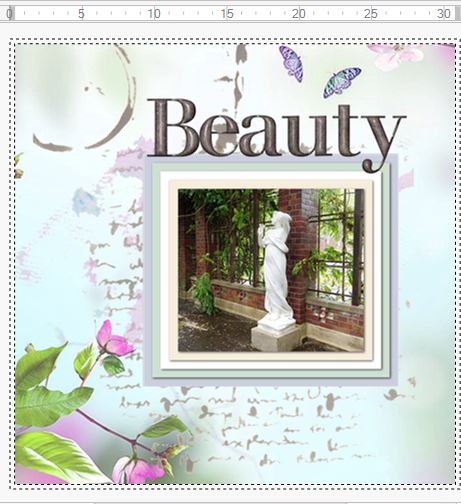
This mood board is so soft and pretty and this is what it inspired me to do:
All of the elements on this page were created by me using different methods, (e.g. stamping, spraying, stencilling),  just like you would if you were creating a traditional layout.
Some time ago, I did a tutorial on how to create digital embellishments and it is these techniques that I've used to create the elements on this page. I've loaded that tutorial on to my blog and here is the link Creating Digital Embellishments. Now here are the steps involved in creating this layout:
Step 1: Background
I chose this ready made paper because it has a soft look, like the mood board. You can make your own paper, once you know how to layer your artwork/elements. For simplicity, I used a readily available paper for my background.
Step 2: Add some water colour
I added these soft water colour splatters by splattering water colours on a page (traditional style), scanning the page, loading it into my digital software (you can do this in whatever software you use), and cutting away the background as explained in the digital embellishment tutorial.
Step 2: Add some stencilling
I've used a script stencil and a coffee stain stencil and I've added them exactly the same way I added the water colour in Step 1.
Step 3: Add the photo to make sure it's balanced
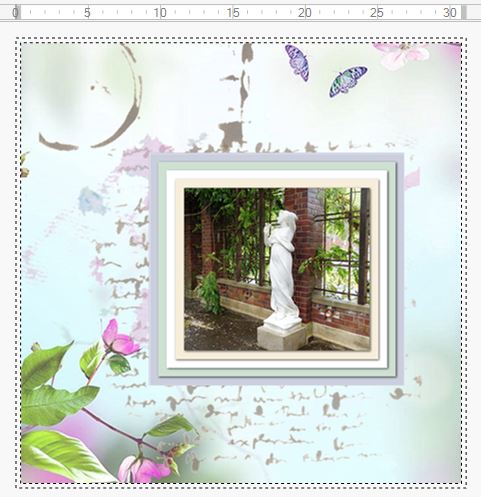
At this stage you can move everything around to make sure it fits. I've added several mats to my photo, in the mood board colour palette, so that it matches the background and helps the photo to pop.
Step 4: Adding a title
When I was fairly happy with the placement of my photo, I added a title. I didn't design this title myself, I used the alphas I already had in my digital artwork stash. I could have just as easily used one of my favourite fonts.
Step 5: The final embellishments
As you can see, I've added flowers as my final embellishments. This step was really special for me because I used photographs of some of the flowers I received for Mother's Day. After taking pics of my flowers I loaded them into my digital software and cut away the background just like in Step 1 and 2, and as described in the digital embellishment tutorial.
It took a fairly long time to do this layout but the process was so satisfying. And, the end result makes me happy because the photo was taken at the Wintergardens in NZ, a place I loved visiting. Also, I have incorporated my Mother's Day flowers and I still have them in my personal artwork file to use over and over again.
If you want to ask me any questions please feel free.
Thank you for dropping by.

Wednesday, July 1, 2015

July's Challenge

Welcome to the second half of the year, I am not too sure where the first half has gone but gone it has.

This month we are giving you the choice of two very different but gorgeous mood palettes.


Which one will you choose to be inspired by? Shall we see what our creative Design Team came up with?


Out for publication 


What an amazing array of work created. I am sure that you will find lots to inspire you.


This month we welcome back  Imaginarium Designs as our sponsor, thank you Imaginarium Designs.

Monday, May 18, 2015

Using Digital Packaging

Using Digital Packaging
Hello, it's Wendy here again.
I've seen tutorials on how to use packaging on traditional layouts so I thought I would show you how you can use the same principle on your digi layouts. You might think there is no packaging because digital products are downloaded straight to your computer. In a way this is correct but many digital products have a "preview" page. The preview page is the digital equivalent of the pictures you see on traditional scrapbooking packaging.
I used a preview page to create the glittery strips on my DT layout for this month.

The horizontal strips behind the photo would normally take a lot of time to do - finding co-ordinating papers, cutting each strip, and grouping or flattening them together. However, I produced my strips with one digital custom cut. This is the preview page I used:


You can produce your cut-out in the time it would normally take you to find all the papers you need. Also, the entire cut-out only takes slightly longer than cutting one single strip.
This is a page capture of how easy it was to do the cut-out. I've used the Panstoria Artisan programme, but all digital programmes allow you to custom cut paper. I used a continuous, straight line to cut this shape and it only took a minute.
Once I did the cut-out, I rotated it horizontally to suit my layout. I also added a shadow to give some dimension.
As well as being able to use the preview pages/packaging to make custom cut-outs, you can "fill" any existing shape with a preview page. I used this preview page:
to produce this butterfly:

With this example, instead of using the "Custom Cut" tool, I used a pre designed shape and used the "Fill" tool to fill it with the preview page.

I hope I've given you a couple of tips on how to use your "packaging" to expand your digital artwork supplies.

Thanks for looking and see you again soon.

Sunday, November 16, 2014

Revisiting Old Layouts

Hello everyone Wendy here with you today.

I wonder how many scrapbookers revisit their old scrapbooking layouts. I do this all the time and, although I don’t think I have a particular style, I’m always amazed at the difference between now and my earlier efforts.


 I first dabbled with scrapbooking about 10 years ago but never really followed through. I guess it was because I was time poor, and short on supplies. Then about four years ago I decided to take it up again and since then I have been scrapping fairly consistently. About three years ago I started trying digital scrapbooking and it didn’t take me long to get hooked on it. Now I love doing all sorts of scrapbooking and it’s such a pleasurable pursuit for me. I’m glad I renewed my interest in it.


I thought I would show you one of my very first scrapbooking efforts that I did in 2005.


The photos are from 1995 and, as you can see, I’ve used patterned paper, one sticker and I’ve hardly done any journaling. 


At the time I think my main concern was to get all my photos out of their old albums where the glue was making the photos deteriorate. Once I removed all the photos and filed them I was overwhelmed with the huge task of scrapbooking them all, so I took on the task with speed rather than creativity in mind.  This was probably another reason why I didn’t follow through for a few years.

Anyway, the following layout is more like the way I would scrap the same photos today.  A big difference, I’m sure you’ll agree.
  
I have been told that your scrapbooking style over the years tells a story in itself and, as such, you shouldn’t change your early layouts. I agree with this to a certain extent. However, I want to leave my scrapbooking albums to future generations to enjoy, so I will definitely be revisiting some of old layouts and updating them!


Thank you for reading part of my scrapbooking story.


Cheers from Wendy.

Tuesday, September 16, 2014

Making Glittery Digital Embellishments

Hi, it's Wendy on the blog today. 
I thought I would pop over and show you how I upscale some of my digital elements.
For the Off the Rails Scrapbooking challenge this month I did a digital layout based on the mood board and colour palette inspiration.


So today I thought I would show you how I made my elements glitter. I used Panstoria Artisan software to do this layout but you can get a similar effect with most digital software programmes. You just need to experiment to find the right tools.

First off, I chose a flourish from an art package by Creative Memories called Earthly Serenity. I chose this because it looks like a crucifix.


Then I chose some glittery paper from another art package called Weather Watch by Lindsay Jane. I used the gold coloured paper to colour my element.


This I did by clicking on my crucifix element to tell the programme what part of the page I want to change (you can see it is highlighted with a series of squares). Then I clicked on the gold paper and a drop down box appears with a number of options. I chose "Fill selected element" and the photo above shows what I ended up with.

Even though it's glittery, the element is still flat. I needed to do a couple of things to give it more dimension. For this I used the "Format" "Filter" tools (you can see them highlighted on the photo below).


As you can see, I still have my element highlighted so that the programme knows exactly what I want to format. After selecting "Format-Filters", you will be given a number of choices. I used "Edge" "3D Edge". At this stage you should get another screen with a drop down. Your screen should look like the photo below.


Once you experiment with the settings and get your edge exactly as you want it, click on "Apply" at the bottom of the page. Your element will have much more dimension then.


There are other ways of making glittery paper and elements but that's for another time. This is the most simple way I know.

Thank you for stopping by. Cheers :)