Showing posts with label Mini Canvas. Show all posts

Thursday, August 11, 2016

Little Canvas Mini Album with Tania

Well Hi!!! Thanks for taking a peak at my first Tutorial at Off the Rails, I'm thrilled to be here!
Today, I have a cute, little canvas mini album to show you!
I purchased this Francheville mini, canvas album at Spotlight, quite some time ago.


I had made one previously in a class taught by the lovely Sharon Laakkonen from Prima, that was in Cairns some years ago! (And I always loved the feel of it, and the prettiness of course.) 
To colour the pages, I used a few different mediums, Distress Stains, Heidi Swapp Colorshine, and Distress re-inkers mixed with water.


You can dry with a heat gun or pop them out in the sun for 30 minutes! 
The purpose of this mini album, was to house some pics of my daughter's 7th Birthday. I had scrapped them previously, but due to moving around and things being in storage, they got a little tattered, so needed a new lease of life! So, I wanted some fun and funky colours.
The next step before decorating is to punch holes in the album pages. I did this with my punch and set tool, but a Crop-a-Dile will also do the job. (I measured about an inch in from each edge, and then used the first page as a template to do the rest.)


I did some stash busting and found some colourful eyelets that have been waiting for the perfect project!
Because I haven't used a kit to embellish, I needed to have some consistency throughout my pages, so I sewed this gorgeous lace onto the bottom of each page. You could use a machine, but I chose to hand-stitch mine. 


Now for my pages!
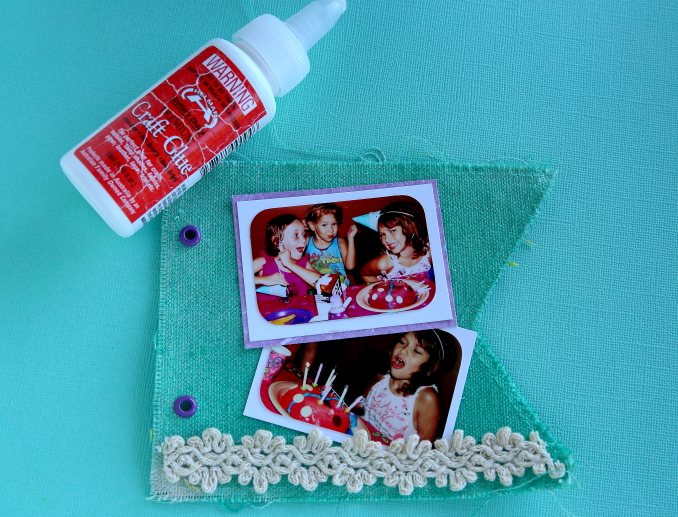

My preferred adhesive for this project was the Helmar craft glue. I am normally a tape girl, but for fabric this is my absolute go to glue. It also helped the project come together rather quickly!


To embellish the pages, I really used up alot of bits and pieces! Prima and Kaszazz flowers, Heidi Swapp ephemera, wood veneer and stickers!!! There's a Greatest View Flair on there too. 


I had a spare canvas flower, from Prima which I re-coloured and popped some Ranger Ice Stickles in the middle to mimick the other sparkly Prima flowers in the album.


I included a few more flairs from D-Lish Scraps in the pages, and used up a few random embellies and flowers.

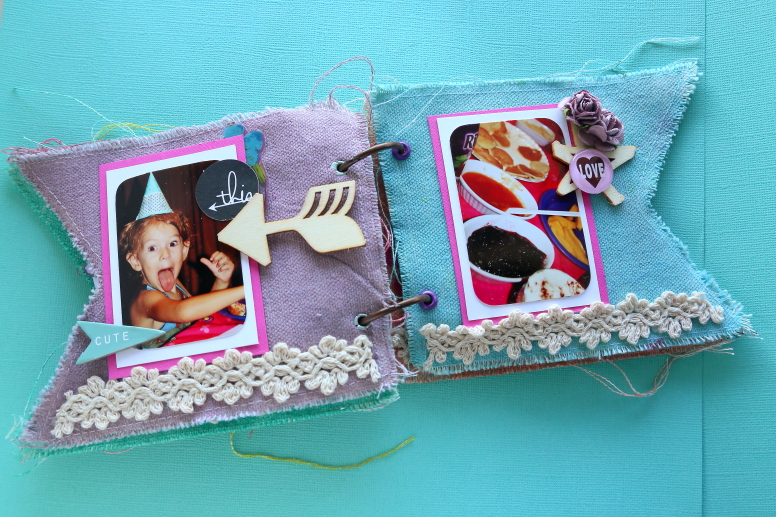

A few of the flowers were re-coloured to match the colours in the opposite pages. 


This aqua flower, was sprayed with Dylusions first and then when dry I used my finger and just wiped a bit of Gesso on the tops of the petals, to tone down the brightness.


And here is the finished product, joined together with some hinged rings! I just love all the texture! The good thing is, I get to gift it to my daughter all over again, she loves it!

Thanks so much for joining me, and be sure to stay tuned to us at Off the Rails, for loads more Design Team inspiration!!


Thursday, December 10, 2015

"Santa's Coming To Town"

Hi, everyone. Carol today sharing a Christmas themed project. I love this month's mood board and currently still in miniature crafting mood. So I made this frame with miniature scene again.
"Santa's Coming To Town"

I used my Silhouette Cameo to cut out this blue shadow box frame. Then I hand cut the white snowy frame around frame area and added glitter glue to create snow effect. Also hand cut the 2 snowcapped mountains and the green bush. The title and santa on sleigh is stamped with Papertreyink stamp and pop up with foam tape.


For the house and lamp post, I diecut with Marianne Design dies. As the house is just a flat piece, I added 2 layers of foam tape behind and adhered to yellow cardstock. I also added stamped table and chairs (Papertreyink) and diecut Christmas tree (Marianne Design) inside the house and pop them with a layer of foam tape.


Added a enamel dot on the door and glitter on the snow. Also stamped, colored and cut out a mailbox and the pathway (both from Simonsays stamp set).


I love to create 3D look with foam tape. Here you can see the different layers. It makes the diecuts and stamps look alive. I even pop up the tiny tiny lamp post with foam tape too.

I hope you enjoy my sharing. Do join us in December's Mood Board challenge here. Simply adore the colors and Christmas village inspiration. Have fun. And a early Merry Christmas to all.

Wednesday, July 1, 2015

July's Challenge

Welcome to the second half of the year, I am not too sure where the first half has gone but gone it has.

This month we are giving you the choice of two very different but gorgeous mood palettes.


Which one will you choose to be inspired by? Shall we see what our creative Design Team came up with?


Out for publication 


What an amazing array of work created. I am sure that you will find lots to inspire you.


This month we welcome back  Imaginarium Designs as our sponsor, thank you Imaginarium Designs.

Friday, September 5, 2014

Mini Canvas with Jelissa

Hello crafty folks!

The weekend is here and I have a fun project for you today that you can try out over the weekend.
This is a mini-canvas with a configuration box and I've used lots of 13arts goodies to alter them. Below is a step by step photo tutorial that I've put together for you.

Step 1:


Prime your canvas and configuration box with gesso. I've used 13arts' acrylic primer for this, and the configuration box used to hold some of the Prima resins in my stash.

Step 2:


Using Ayeeda Paints in Matte Caramel and Matte Peach, dry brush the exterior of the box and layer the darker colour over the lighter one. There is no need for full coverage here and allow some of the gesso to peek through for a more rustic look.

Step 3:


I forgot to snap a photo of the mists I used, but they are Ayeeda Chalks in Pastel Green and Turquoise. Water down the mists to get the desired shade. Following that, I used 13arts acrylic modeling paste over one of their stencils and used it to create a grid pattern.

Step 4:


With Ayeeda Paint in Matte Pink, apply over a stencil randomly.
Water down the paint if you like.

Step 5:


Some random stamping with black archival ink.

Step 6:


One of my favourite things: altering chipboard! I'm using the Wild Flourish Bundle and a piece from the Vintage Lock set and altered them using the paints and mediums shown.

Step 7:


Assembling the pieces. I'm using some chipboard stickers and flowers, as well as resins from Prima to fill out the cubby holes in the box.

And voila, the project is done!


Some close ups:


A bow covered with Pearl Gold from Ayeeda Paint.


Thanks for joining me today, and have a crafty weekend!

love, 

What a gorgeous way to start the weekend.
Thanks Jelissa for this amazing tutorial