Showing posts with label 2Crafty. Show all posts

Friday, October 9, 2015

September Winner

The months of the year seem to be slipping by quicker and quicker, and today we share with you the winner of last months challenge. So many stunning entries, thank you to all who were inspired by the mood palette.

Congratulations Lizzy Crust


Lizzy please email Candy to claim you prize.

Wednesday, September 30, 2015

Thank You 2Crafty

This month we welcomed back 2Crafty Chipboard as our sponsor. 
Thank you 2Crafty, we very much appreciate your support.
Please help us thank 2Crafty and follow them on social media (see links below)


2Crafty Chipboard is an Australian owned and operated manufacturer and wholesaler of laser cut chipboard products.

Located in Sydney, Australia. We have been in operation since October 2006 and have more than 1000 designs on offer.We pride ourselves on quality products that are versatile and up to date with market trends, as well as offering unbeatable customer service, with quick turnaround of jobs large and small.We are happy to quote on personalised jobs, whether it be a single title for a customer, or large jobs for retreats, classes etc.If you are a retail business and would like to stock our range of unique products, please contact us for more information
Please click on the links below to find out more about 2Crafty

Website


Sunday, September 13, 2015

Mask Shop in Las Vegas

Hello friends!!!
Today I am here with another tutorial!
It's a layout using our mood board this month!

9.September

I did a background keeping the theater climate in my project. Harlequin style!
The photo of this project is a mask shop at the Vennetian hotel in Las Vegas.

_MG_3904

Come on?
1 - Prepare your background using a stencil and a ink pad, you can also use acrylic paint or spray.
20150830_204013


2 - Leave some spaces without completing.
20150830_204411

3 - Separate scraps of paper.
20150830_205337

4 -Using foam tape, apply the patches below the photo, to make volume.
20150830_210745
20150830_212730

5 - Apply tape using the staple as shown in the picture!
20150830_214248
20150830_214646

6 - Apply some stamps or text of your choice!
20150830_215446
20150830_215814

7 - Apply some sparkles on the page.
20150830_220340

8 - Finish drawing with stencil and black pen!
20150830_220927

I hope you enjoyed the project and come play with us!!
Materials: cardstock, Finnabair stencil Harlequin #961305, Finnabair cling stamp #962067, ink pad Stazon, scraps of papers, doily, alphabet, black pen, staple and ribbon.

We thank our sponsor this month!
2Crafty Header

We will be very happy if you use their product in your project!
See you soon! xoxo

Sunday, September 6, 2015

Plain and Boring Not Any More

Sandi here with you today.
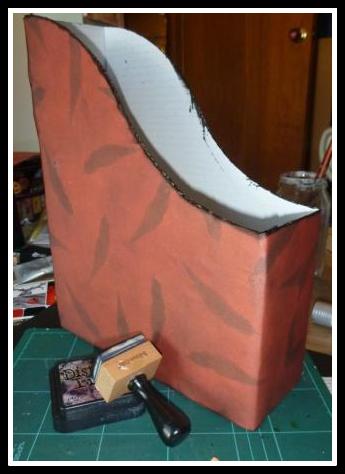
Over the last couple of years I have as you possible have or are, collecting lots of scrapbooking magazines. So instead of having boring plain magazine holders I thought why not scrap them too.

Here is Septembers Off The Rails Scrapbooking Mood Board which is sponsored by the amazing Chipboard company 2Crafty

Off The Rails Scrapbooking


2Crafty Chipboard


Items I used:
Blank white magazine holders from Ikea (pkt 4)
Black gesso - Monte Marte

12" x 12" paper of choice; mine was from my old stash (Crafty Kids now known as Kaszazz)

2Crafty Chipboard 'Square collage panel'
TCW Rebekah Meir designs 6" x 6" mini Labyrinth stencil
Semco Acrylic black and white paint.
Monte Marte Modeling paste 
StazOn Black Ink
Tinby Metallic Melts 'Glistening Snow'
'Funky tree' and small Feather stamps; Kaszazz
Black and red card Stock; Kaszazz
Black and white twine
Funky Flair 'Jar of Joy'
Kaisercraft 'Outdoor trail' 6" x 6" paper pad; The stag and paper that the feather was stamped on.
Tim Holtz Distress Ink 'Black Soot'


  1. Firstly  I assembled the flat pack cardboard magazine holder. 


2. Use the box as a template to transfer its shape onto the paper you wish to cover the sides and front with.


3.Using Black Gesso paint the edges and the back of the magazine holder.


4. Waiting for it to be completely dry.

5. Glue the paper onto the holder with the join in the front. (This will be covered)

6.  Blend upper and lower edges with 'Black Soot' Distress Ink, you can also at this stage paint the inside of the box black.


7. Cut a piece of black card slightly smaller than the front panel of the holder and then cut a red one smaller than the black card. Use double sided tape to join them together.

8. Mix black and white acrylic paint together to make a shade of grey darker than you need then add some modeling paste, this will lighten the colour.


9. Using a spatula and the stencil add the grey modeling paste to one side of the new panel piece.


10. Cut up the 2Crafty panel to achieve the shape that you want. Mixing some more grey paint, cover the pieces with paint and then sprinkle Metallic Melts over it. Use a heat gun melt the Melts, if you need to add more Melts cover the pieces with embossing distress ink first before sprinkling on more melts and using the heat gun again. This is the beauty of these embossing powders; it can be heated more than once which can lead to layering of colours if you wish.


11. Using StazOn to stamp a tree onto the opposite side of the panel   on the lower corner. I stamped another onto some black card and cut out whilst I could still see the out line before it dried. I also printed a feather onto some paper I found that had stags and outdoor contour patterns on it. I cut out the feather and the stag to add to my panel.


12. Now play around with the placement of your photo (mine was chosen from the mood palette) and layering papers, twine, stag, feather and funky flair (which had chosen because of the jar in the mood palette) and glue then in place. 

13. I added a few words onto the background, you may chose to use a word/text background stamp.

14. Glue panel onto the magazine holder and fill with your favourite magazines. 

Below are some closeups for you to see, the flower in the photo has come out more orange than red which I'm disappointed with but you will get the idea.

Thanks to dropping by to check out my latest tutorial, hope you enjoyed it and be sure to pop back to see the other amazing pieces of art from the Off The Rails Scrapbooking Design Team and of course the fantastic entries as the month goes by.


Wednesday, September 2, 2015

Welcome back 2CraftyChipboard

This month we welcome back 2Crafty Chipboard as our sponsor. We are excited to have them here. Thank you 2Crafty, we very much appreciate your support. 


2Crafty Chipboard is an Australian owned and operated manufacturer and wholesaler of laser cut chipboard products.

Located in Sydney, Australia. We have been in operation since October 2006 and have more than 1000 designs on offer.We pride ourselves on quality products that are versatile and up to date with market trends, as well as offering unbeatable customer service, with quick turnaround of jobs large and small.We are happy to quote on personalised jobs, whether it be a single title for a customer, or large jobs for retreats, classes etc.If you are a retail business and would like to stock our range of unique products, please contact us for more information
Please click on the links below to find out more about 2Crafty

Website


Tuesday, September 1, 2015

Spring Has Sprung

Here in Australia it is the first day of Spring, we are yet to feel it in Melbourne but it is on it's way I am sure (and hoping). Because it is the first of the month that means we have a mood board challenge. It is moody, dramatic and the design team have done an amazing job with it.


We would like to welcome back 2Crafty Chipboard who are our sponsor this month. They are offering the lucky winner a mixture of their
 gorgeous chipboard. Who doesn't love chipboard.


Please Note our sponsors this month, 2Crafty, will post Australia-wide only.  International entrants, please note that if you enter, we have to assume that in the event you are chosen as a winner this month, you are prepared to pay the postage for your prize.

Sunday, May 31, 2015

Thank You 2Crafty

Thank you 2Crafty, we very much appreciated your support for the Month of May. 

Also thank you to the 2Crafty Design Team, they created beautiful pieces of inspiring art using our mood board.


2Crafty Chipboard is an Australian owned and operated manufacturer and wholesaler of laser cut chipboard products.

Located in Sydney, Australia. We have been in operation since October 2006 and have more than 1000 designs on offer.
We pride ourselves on quality products that are versatile and up to date with market trends, as well as offering unbeatable customer service, with quick turnaround of jobs large and small.
We are happy to quote on personalised jobs, whether it be a single title for a customer, or large jobs for retreats, classes etc.
If you are a retail business and would like to stock our range of unique products, please contact us for more information

Please click on the links below to find out more about 2Crafty


Wednesday, May 20, 2015

2Crafty Chipboard Guest Designing

It is such an honor to have the 2Crafty Chipboard team popping in to Guest design for us this month. They have totally rocked this months mood palette.


Not only did Wilma create this stunning layout she also create a video to share on how she created it. Please follow the link below
https://www.youtube.com/watch?v=hFELg3Y-sDQ

Don't forget to visit the links below to help support 2Crafty who is the sponsor of this month's challenge.