Showing posts with label butterflies. Show all posts

Monday, November 16, 2015

1 Stamp 2 Cards


Hello All, Deena on the blog with you today.

I love butterflies and I have a stamp from Stampin' Up called SwallowTail which I just love but haven't used much. So this month using the colours from our Mood Palette I have created 2 quick and easy cards with this stamp.

Below is our mood palette and I would love to see how you would use it.


All the Products I used are from Stampin' Up
Stamp - SwallowTail
Stamp - Butterfly Basics
Stamp Birthday Blossoms
Ink - Basic Black
Ink - Daffodil Delight
Ink - Soft Suede
Ink - Pool Party
Ink - Cucumber Crush
Cardstock - Whisper White
Cardstock - Basic Black
Re Inker - Cucumber Crush
Re Inker - Daffodil Delight
VersaMark
Clear Embossing Powder


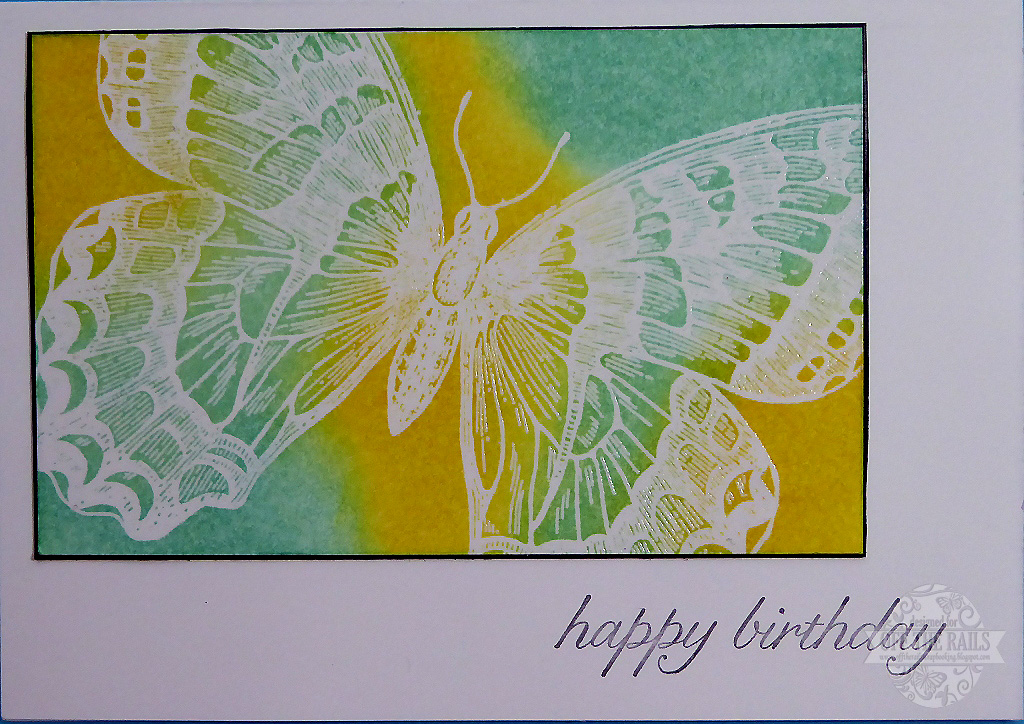
Card Number 1
1. Cut cardstock to required size. Make sure that the cardstock is smaller than the image you plan on stamping.

2. Using VersaMark ink pad stamp image.

3. Embossing with clear embossing powder.

4. Using cut & dry stamp pad foam I inked my white cardstock with Pool Party and Daffodil Delight. The embossing acts as a resist. 


5. Mount image on black cardstock.

6. Attach to the left had corner of card base.

7. Stamp sentiment in lower right hand corner.


Card Number 2
1. Cut A4 cardstock in half to form the card.

2. For each colour of ink used I filled mister with a small amount of ink  then add water. 

3. Lay cardstock on a protected surface and spray.

4. Dry both sides of the cardstock.


5. Score cardstock to form the card base. Normally I would have done this after cutting the card base but I wanted the colour on the front and back.

6. Stamp Butterfly image and sentiment.

7. Flick card with the watered down ink.


Monday, August 3, 2015

Swallowtail Bleaching Technique

Hi everyone it's Narelle here to share with you a fun technique.

A few days ago you would of seen my page for the August mood board and sketch. On that page I had two large black butterflies which were a lovely lemon colour. I created those butterflies using bleach. Here is a reminder of the page.

Narelle Fasulo - Independent Stampin' Up! Demonstrator


I quite simply just coloured the butterflies with bleach. Here's how you can do it too.

First, rub the surface of the card stock with your embossing buddy. This will remove the static and make sure that the embossing powder does not stick to where we don't want it.


Then you stamp the Swallowtail onto the card stock using Versamark. Versamark is a clear ink which stays wet longer giving you the time to add embossing powder without the image drying.


Now sprinkle your embossing powder over the stamped image. Make sure you get a good coverage. Tip off the excess. If you have some powder stuck in the intricate parts of the design where you don't want it, just flick the back of the card stock and it should come off.


To set the powder and create the glossy look you need to melt the powder using a heat source. I used the Heat Tool which is fast and effective. But a word of warning here, even though heat guns look a bit like hair dryers, they are way more hotter and will easily burn. So please be careful. And you can't use a hair dryer for this as it will blow the powder away as they normally have a much more powerful fan.


As you heat the embossing powder it will start to melt and go glossy. Heat the image in sections until all the powder has melted.


Now fill an aqua painter with bleach. I just used the household cleaning variety of bleach. Please fill your aqua painter in a well ventilated room and its probably best to use gloves. Make sure you mark your aqua painter so you don't accidentally pick up the bleach one when you want to water colour in the future.


Now just paint over the image and you will see the magic happen. I have used Basic Grey card stock which turns a lovely lemon when bleached. As the card stock dries the colour will show more. For the best effect, colour the image then let it dry. If you want more colour to show, then just keep repeating the process.


Every card stock will react differently and give different colours when bleached. So have a play with different colours to see what effects you can get. It is a really fun technique that is easy to do.

I hope you try it soon.

Thanks for dropping by.
Have a great day.
Cheers,
Narelle

Monday, June 22, 2015

Priscilla has a tutorial to share with you...

Hi everyone,

I'm back today to share another mixed media canvas I have created. Lots of Prima Marketing products were used on this canvas. If you love Prima Marketing and has not venture into their new range of Art mediums, it's a good chance for you to see how I mixed all the different mediums to churn out this piece of dreamy canvas.


Do check out this 8mins video which shows the whole process of creating this canvas. In the video I will be listing out the supplies used as I go along. I hope you like the tutorial and do feel free to leave any comments.


Before I leave you, here are 2 close up shots for you to have a better look at the lovely texture.


Thank you for taking time out to check out my post :)

You can see more of my work HERE

Wednesday, June 3, 2015

Narelle's tutorial for June

Hi everyone, Narelle here. It's my turn on the blog today. So I wanted to share with you how I made the fence on my card that was on here other day.

As a reminder, here is the card.


And this is a close up of the fence on the card.
 
Narelle Fasulo - Independent Stampin' Up! Demonstrator
It really is easy to make. Here's  how.

All you need is a brown piece of card stock, a darker brown ink pad, a woodgrain stamp or even a woodgrain embossing folder would work too if you inked it up. Then you need a traingle punch or scissors and a cotton bud or something similar.

Step One - stamp your card stock with your inked up woodgrain stamp. Your piece of card stock can be bigger than the size of the fence you want as you can trim it down later.
 
 
Narelle Fasulo - Independent Stampin' Up! Demonstrator

Step Two - Once the ink dries, use your triangle punch and line up the point of the triangle with the line between the palings and punch. If your stamp doesn't have the lines like mine does, just punch evenly along the egde to make the palings. I like to punch the first one, then draw a line across so that I get them all punched evenly. If you don't have a triangle punch or any punch with a v shape in it, then you can use scissors to make the same v shape in the fence.
Narelle Fasulo - Independent Stampin' Up! Demonstrator

Narelle Fasulo - Independent Stampin' Up! Demonstrator

Narelle Fasulo - Independent Stampin' Up! Demonstrator


Step Three - Rub out the pencil line. Trim off any half panels from the ends to tidy it up. Use a cotton tip and your ink pad to ink around the edges of the fence and down each individual paling. I find a cotton tip is easier to use than a sponge dauber as you get a finer line between each paling. You can also use the cotton tip to highlight features in the wood as well.
Narelle Fasulo - Independent Stampin' Up! Demonstrator


This is what your fence should look like when done.
Narelle Fasulo - Independent Stampin' Up! Demonstrator


Enjoy making one and including it in a project soon.

Thanks for popping by.
Have a great day.
Cheers,
Narelle 


Monday, June 23, 2014

Creative Journey...with punched cards...& Lizzy

Hi there, my scrappy friends:)
Today I thought I'd take you on a creative journey...starting with a simple punched card. Even the UN-card maker peeps out there will be able to make these! Then, I'm going to take you beyond to something more;)
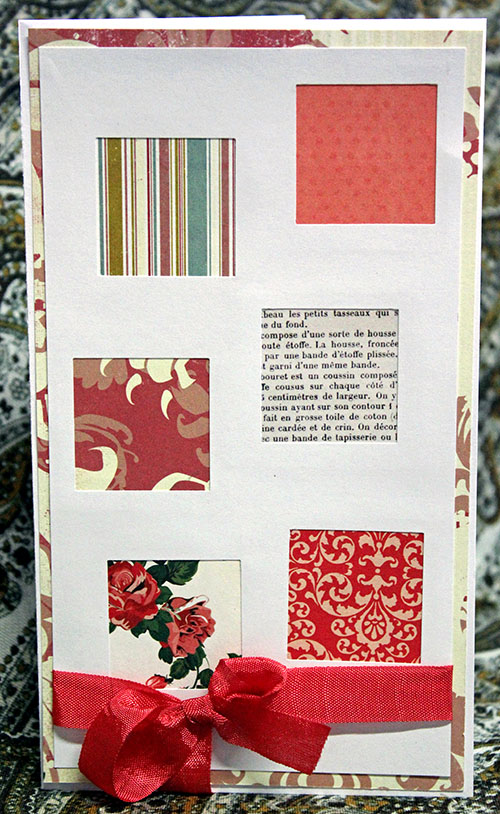
OK. I'm sure you've all got a load of punches lurking round...find a shape one - like a circle or square...this technique is best for taller, skinny cards. Do this to your piece of cardstock that you've cut to fit inside front of your card:


Next, take one of the punched out squares & using that STASH, match up 6 patterned papers & cut them slightly bigger than the square. Don't be fussy - you won't see the edges:)


Now simply stick these behind the 'windows' you've created. Here's the back [wrong] side:


And here's the other side, finished...you can add any number of embellies to this basic design:


Can you see I've made my 'window' card stock small enough that another layer fits behind it on the card as well? Soooooo....I quite enjoyed this....& thought I'd do a similar thing with my circle punch for a male card...using the same technique:


FAB stash busting! And I've finished with a bit of wood to show you how to spruce things up:


Then I got thinking - what if I made my own paper...you know, did a bit of misting over the shapes.....so out came the star punch - this one is an 'around the page' beauty. 


Using some Studio Calico packaging, which has a plasticised surface, I randomly stamped some stars, then misted through the stencil I'd made...


then, there was lots of mist left over, so I stamped that onto another piece of cardstock:


In the middle of doing this, I thought about a chevron mask I have & how these colours would look nice behind some butterflies...so I got side tracked & went & did this:


And even though I wasn't sure whether my butterfly punch would work, I thought I'd give it a shot...it was FINE....so I created this:


I know some of you will go 'Well, you could just punch the shapes & pop them on TOP of the card!' ..but I don't know, I LOVE the dimension, the peekaboo effect this gives:)
Then, I decided to try & use those stars up....so, using the star images, I grunged up this card -- along with some stars punched out from the left over chevron paper:


Isn't is AMAZING where a CAS, punched card can lead you? I hope you enjoyed this little journey through the way my brain thinks & that you can use some of the ideas here....ESPECIALLY if you are not usually a card maker;)
Happy scrapping, folks - Lizzy H ♥♥♥

Saturday, June 14, 2014

Up, Up and Away

Up Up and Away, what does that bring to mind? Birds, Balloons, Clouds, Butterflies, are just a few that sprang into my mind. Shall we have a look at what the Design Team created for this new challenge.


Please help me welcome a new sponsor to our blog, 
Pam has generously dontate a $25 gift voucher

Please Note: Postage is covered on the goods purchased with the voucher but if you are an international winner the postage only covers stamps 

Cannot wait to see what this challenge inspires you to create.
Also just to let you know that you will be able to enter a project into this challenge up until the 30th of June.
Dont forget to follow us on Facebook and Pinterest
Happy Creating