Showing posts with label altered box. Show all posts

Friday, November 17, 2017

Altered paint brush with Joan

Joan here today and  I have discovered the art of altering paint brushes ... my new favorite thing to alter!

For this altered brush I started out with a 4" (new) paint brush from Lowe's.


 I covered the brush handle and bristles with a couple light coats of white Gesso.


 Next I gathered my supplies from my stash of things I thought I might use.


 Then I painted the handle and metal band with several layers of paint.


I coated the wood handle with a light coat of Mod  Podge and added the tissue paper to the handle.


My favorite part was adding the embellishments.  For me it's a process of finding balance, proportion, variety and harmony.


Thanks for checking out my new favourite creation.

Joan (The Gov)


Friday, March 6, 2015

Turning A Used Box into A Gift Box

Today we have Sandi sharing a tutorial.

Easter is coming up and of course everyone loves chocolate. If you are making your own chocolates which I love doing what better way to give them to your loved ones than in a box that has been personally decorated by you. This is what I've done and would like to share how I did it.


Firstly I found a small box from my recycling box and chose a textured paper from the Mix'd Media Stax 2 from Donna Salazar designs paper pad and cut it to cover the lid of the box. I also chose some pale blue lettering stickers from Creativ.


After gluing it onto the box I cut a small paper doily from the pack of 3 size doily from Creativ in half. Using Tim Holtz Distress Ink 'Vintage Photo' and 'Linen Antique', I blended each ink over the doily to give it an antique lace effect and glued it down onto the corner and it's sides.


 I chose several pieces of paper from the Kaisercraft 'Hello Today' 6"x 6" paper pad and tore them into strips and glued them vertically onto the top. The flower and butterfly washi tape I placed horizontally was from Kaszazz.


 The next set of resources I sourced was Mont Marte White Gesso and Modelling Paste, Jo Sonja's acrylic paint 'raw umber', 2 Crafty 'mini chicken wire' chipboard, Prima stencil 'stone wall' and a WOW chipboard 'Mini Messy Rectangle frame'.


Using my wonderful new spatulas given to me by my amazing friend "Thanks" I smeared some White Gesso over the top of the strips and washi tape to blend and soften them. Mixing the paint with the modelling paste I applied it over my new Prima stencil onto my box. While they was drying I painted the chicken wire chipboard and messy rectangle with the 'raw umber' paint.


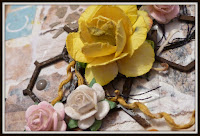
The next group of items I collected to use included a butterfly from the Kaisercraft collectibles 'Curiosity', Franchville enamel dots 'yellow' and 'black', Green Tara Water Hyacinth twine, Prima and Kaisercraft flowers and some black cotton.


Some of the flowers I left white, and some were painted with Dylusions Spray Ink 'Lemon zest' mixed with 'White Linen' and 'Bubblegum Pink' with 'White Linen'.


After a lot of experimenting with placement I decided that more chicken wire was needed and a few more flowers as well and this was my final placement and finished box.


I hope you have enjoyed reading my tutorial, been inspired and take some time to read other artists amazing tutorials and gorgeous layouts at Off The Rails Scrapbooking

Saturday, November 29, 2014

Sanna's Altered Perfume Box

Hi there! Sanna here today with a little present idea for Christmas. I collect all kinds of junk - even my kids and husband ask me if I can use a certain piece for something, before throwing them away. And near relatives have now gotten to know the family habits too. That is why I am lucky to receive all kinds of empty, unwanted boxes to add to my stash. The others don´t need them, but I see potential in them. This box, for example, was a perfume packaging I then received when it was empty.

I love this kind of boxes as they are very robust and easy to alter. Now that Christmas is around the corner, it´s time to start thinking about presents, right? What better way to reuse this perfume packaging, but to revamp it  and then give it to a loved one, family member or a friend as a little present.


So what did I do with the box? As you might see in the lower part, there is still some mint green peeking thru. Well, that is the original colour of this box. It also had a very nice matter finish, so I didn't want to cover it all up, that way the outside and the inside of the box match each other.


I then added some wooden "feet" to the box. I glued them down with my all time favorite "Aleene´s Tacky Glue" and they really stay put! I then used some papers my Maja Design. I cut them into the right size and glued them on their places with decoupage glue/Mod Podge. I covered both sides of the paper with that glue, that way the paper will not wear up when using it. Also the doily will not break, when covered with decoupage glue. After the paper layers had dried, I applied some velvet and pom pom ribbon around the box lid and a resin lock for additional detail. All these parts I glued down with Aleene´s Tacky Glue.


The chipboard pieces are by Wycinanka and I covered them with white paint and then added some light grey paint here and there for a shadow effect and finally added a layer of glitter glue on the grey areas. The flowers are by Prima Marketing and I added some glitter glue on the petals for more shine. I then took an old door knob and adhered it into the middle. The box can now be opened easily.


There is also some glitter glue around the banners on the top. Just for additional detail and shine. This box makes a pretty neat present box for Christmas (oh, and by changing the papers and colours, you can create a totally different look, of course). It can be a gift on it´s own or filled with chocolate, candy or something nice and sweet. So next time, before throwing those perfume boxes away, take another look at them and reuse them. Christmas is coming, lovelies, so time to start creating ;-)... Have fun!!!

xoxo, Sanna