Hello scrappy friends,
Sarah here again with another easy but effective background for you to try. As you can see on my October Halloween scrapbooking layout, I have used two shades of blue in the Tim Holtz Distress Ink range - The base is Faded Jeans and the stenciled colour is Chipped Sapphire.
First step is to take your lighter colour and apply it all over your cardstock. It's a good idea to make sure your ink pad is nice and juicy - mine was not so it took a while to get adequate coverage all over the cardstock I was using. For older ink pads, I found a few spritz of water can help revive it a little. For this layout however, I liked the look of some of the white cardstock showing through so full coverage didn't bother me.
The second step is to dry off your page - distress inks tend to stay wetter for longer. Mine was quite damp in places as I was spritzing water on my ink pad throughout the process.
The third step is to find a stencil you want to use - this one is called Rustic Paint from The Crafters Workshop and I liked how it gave the cracked, almost lightening bolt effect on my background. I chose dark colours to keep in line with the darker shades of the Halloween mood board. I secured my stencil on top of the cardstock with some washi tape around the sides. This assists to hold it in place as I apply the second layer of ink. Using a blending tool, I took the 'Chipped Sapphire' ink and applied this over the stencil.
Keep going until the whole stencil area is covered
The last step is to remove the washi tape and lift up to see you fantastic background! Dry this off with your heat tool to set the colour.
That's as easy as it is! You can of course add further texture, stamping, washi tape etc to your background as required. I hope you enjoyed this tutorial and I look forward to seeing the backgrounds you create using this technique!
Showing posts with label backgrounds. Show all posts
Wednesday, October 5, 2016
Tuesday, April 5, 2016
Creating Backgrounds for Art Journal pages with Elisa
Hi everyone,
Here's hoping you had a fantastic Easter break with friends and family and that you may have had a 'little' time for crafting!!!
It's my turn on the Off the Rails Blog for a tutorial and I decided to show you a few techniques for creating a background on an Art Journal page. These techniques can be used on layouts and off the page projects like Canvases as well etc.
First i'd like to show you the finished Art Journal double page that I created using the April moodboard.
Firstly! head off to your local op-shop or trash and treasure markets...grab a few old books and sheets of music to use as a base for an interesting background. Just check the book for 'racy' scenes....if you know what I mean, I ended up with such a scene stuck on a page a while back and only noticed at the last minute, first time i had to censor my art journal ....lol!
Gesso strips of the book pages to your page in the desired area, in the end it was about approximately 1 inch thick.
Wait til your gesso'd book pages are dry then grab your favourite stencils or masks, I used a WOW Words or Whatever Stencil and a Crafters Workshop stencil. The Words or Whatever stencil I specifically chose due to the flow of movement in the pattern, like a wave across my page, exactly what I wanted. I used 'Snow White' Colour Blast Texture Paste to leave a shimmery white wave of colour across my page, perfect for a watercolour resist technique!
Here I am completing the 2nd page with the first stencil, I tried to match the pattern from the other side so it looks like a flow from one side to the other.
After drying after the first layer, we are ready for the second layer and second stencil. I used a different coloured texture paste called 'Bling' by Colour Blast Australia. I placed it in several areas across the page. The third colour paste is called 'Deep Water' by Colour Blast. Love those awesome shimmery texture pastes which can be found here - http://colourblastaust.com.au/

In the next photo you will see the different results from the multi layering of the stencil and different coloured texture pastes.
The next step and technique that I have used is a 'masking fluid' pen, I have used the pen to create flowing lines and words 'be creative' in the background (use this pen or masking fluid to resist any liquids, let the masking fluid dry thoroughly, then you are ready to add your watercolour paint, sprays or distress stains. For my Art Journal page I used Tim Holtz distress stains in lines up and down the pages spraying with water on top to blend them slightly. Once dry I then sprayed a few shimmer sprays over the top in gold and white.

Once the colours have dried to your satisfaction, it is time to remove the masking fluid. Gently rub with an eraser or your finger or get a steel craft knife and gently lift the end of each line or word and remove the masking fluid which has dried to like a rubbery consistency.
Below are some close - ups of how I finished off the page, some light stamping, a piece of chipboard and a fussy cut hummingbird stamped image plus the application of microbeads in different colours using Gel Medium. Also I sprayed over the top of the whole coloured section with gold shimmer spray.
You can see from the photos above that the masking fluid has added gorgeous white lines and patterns which draws the eye across the page from the left to the right where the hummingbird is situated and the end of my title of Be Happy, Just Love, Be Creative, One of a Kind and Dream....
Well that's it for my Art Journal Background technique tutorial, i hope to see you try a page or two for yourself. Time to get messy!!!
By
Elisa Ablett
http://2crazycrafters.blogspot.com.au
Monday, February 22, 2016
Watercolour Effects on your Background with Mandy
Hi there!
It's Mandy with you today and I am so excited to be sharing my first tutorial here at Off the Rails Scrapbooking!
When it comes to using mixed media on your layouts, do you find it all a bit daunting and scary? I only dabble in mixed media, but I absolutely adore the beautiful watercolour backgrounds that talented scrappers such as Missy Whidden and Adele Toomey create. I wanted to show you how easy it is to create a watercolour effect on your background even for those who are new to mixed media!
I created this layout for the current 'Romance' mood board at Off the Rails...
I'm going to take you through my process for creating this layout.
What you'll need
Obviously you'll choose whatever papers and embellishments you like, but this is what I used to create my layout.
Step 1
Using a credit card or a similar type of card, start by covering your white cardstock with gesso. I used clear gesso, but you could also use white. Just swipe it over your cardstock until it is all covered (or at least the area where you want to apply the wet media). Then wait for it to dry, or use a heat gun if you want to dry it more quickly.
Step 2
Stamp your chosen colour of distress ink onto some plastic packaging a few times, then add a couple of sprays of water. I also sprayed some water onto my cardstock. Next, simply "smoosh"/smear the plastic packaging around on your cardstock. You might need to repeat this process a couple of times until you have covered the area that wish to cover. It's as easy as that, nothing difficult or technical involved!
Step 3
To add some further interest and contrast to the background I did some stamping with black ink. I stamped three plus signs to create a visual triangle on my page, but you could use any stamp you like, and you could add more stamping than this if you wish.
Step 4
Next, add a 10cm strip of patterned paper down the left hand side of your layout with another thin strip of patterned paper tucked under the edge (you could also use washi tape).
Step 5
Matt your photo, then adhere it to your layout overlapping it onto the strip of patterned paper. Next to the photo I've added a piece from one of the cut-apart sheets of patterned paper. Alternatively you could add a tag or a PL card. Underneath this I also added a strip of black lace washi tape.
Step 6
Next add your title to the page. I also added a subtitle underneath my photo as I liked that this balanced out the title at the top, as well as adding another gold element to the page. I mounted up the word 'together' with some foam tape to create some extra dimension.
Step 7
Next I added a pip berry stem over my photo to draw the viewers focus in. You could also make a circle out of twine or wire. I think that this is a nice way to frame the main subject of the photo. Because I had hot pink and white roses in my wedding bouquet, I also included a paper rose in each of these two colours on my page!
Step 8
Then it's time to add some more embellishments to your layout!
I finished my layout off by adding some glitter chipboard hearts and some gold Color Shine ink splatters.
Here's another look at my completed layout...
Here's a reminder of this month's 'Romance' mood board...

I hope that you get a chance to play along with one of our mood boards this month! Our sponsors for February are Candy Chelepy and Memory Maze.
Thanks so much for stopping by, I hope that you found my tutorial useful and enjoyed looking at my layout!
Mandy
Labels:
backgrounds
,
Mandy
,
tutorial
,
Water Colours
Tuesday, February 16, 2016
Background tutorial with Lynn
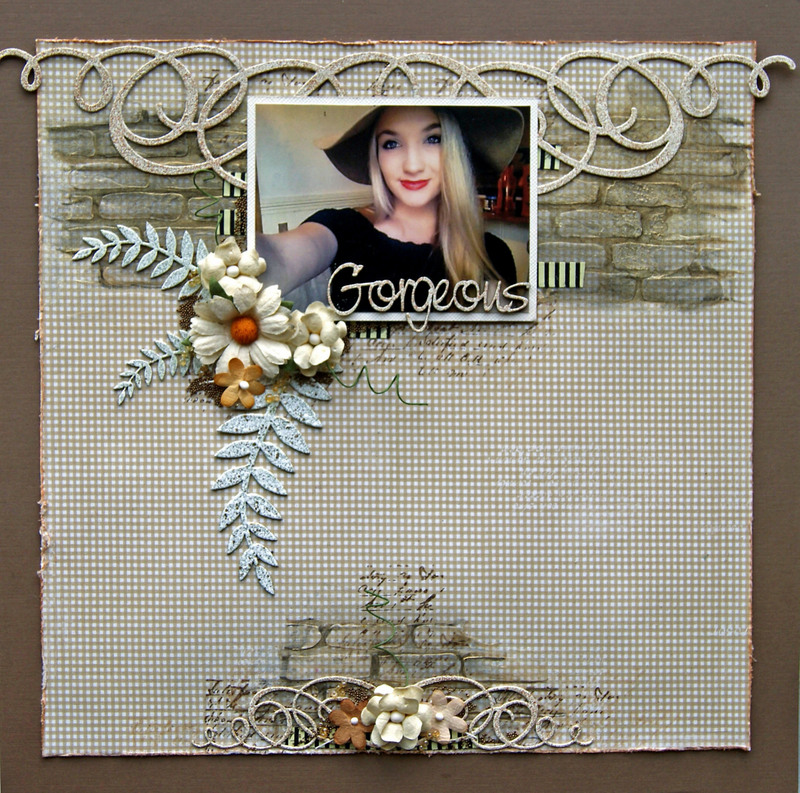
Hi.. Lynn here today. Having two mood boards this month has been great. This is my second layout and I chose to go with the Summer Days layout. I actually had a photo of my son's girlfriend wearing a big hat, so I have been inspired by the colours and the picture. I have created a photo tutorial of creating the background.
Start by cutting 2cm off each side of 12x12 patterned paper and lay on top of the plain 12x12 cardstock. I have used patterned paper by Maja Design - Fika.
Lay out the photo and chipboard and mark with a pencil the area of the photo (No point in wasting products that wont be seen!)
Using a brick stencil and 3D Gloss gel, add some bricks around the area of the photo and at the centre of the bottom of the page.
While you are waiting for the bricks to dry, cover the chipboard with gesso and emboss with embossing powder. I have used whichcraft do you do chipboard and Stampendous Embossing Powder - Golden Sands and Shabby Green.
Now the bricks are dry, I have sprayed around the bricks with Lindy Stamp Gang, "Gossamer Gold" and dried with the heat gun, pushing the spray in the direction I wanted. I then applied Tattered Angels Chalkboard Paint " Iron". I used the nozzle of the sprayer and painted around the edges of the bricks and then blended with my finger.
Now you can building the page with embellishments. I have placed ripped pieces of washi take around where the photo is going to go and randomly stamped a script stamp around the bricked areas. Once you have placed the embellishments to your liking, glue them down and add glass and micro beads for that final bit of bling.
I hope that you have enjoyed this short tutorial and have a go yourself at this months challenge.
Til next time - happy crafting :)
Start by cutting 2cm off each side of 12x12 patterned paper and lay on top of the plain 12x12 cardstock. I have used patterned paper by Maja Design - Fika.
Lay out the photo and chipboard and mark with a pencil the area of the photo (No point in wasting products that wont be seen!)
Using a brick stencil and 3D Gloss gel, add some bricks around the area of the photo and at the centre of the bottom of the page.
While you are waiting for the bricks to dry, cover the chipboard with gesso and emboss with embossing powder. I have used whichcraft do you do chipboard and Stampendous Embossing Powder - Golden Sands and Shabby Green.
Now the bricks are dry, I have sprayed around the bricks with Lindy Stamp Gang, "Gossamer Gold" and dried with the heat gun, pushing the spray in the direction I wanted. I then applied Tattered Angels Chalkboard Paint " Iron". I used the nozzle of the sprayer and painted around the edges of the bricks and then blended with my finger.
Now you can building the page with embellishments. I have placed ripped pieces of washi take around where the photo is going to go and randomly stamped a script stamp around the bricked areas. Once you have placed the embellishments to your liking, glue them down and add glass and micro beads for that final bit of bling.
I hope that you have enjoyed this short tutorial and have a go yourself at this months challenge.
Til next time - happy crafting :)
Monday, July 21, 2014
Revamping a Layout
Hullo my friends! Lizzy with you today – to show you how I’ve ‘revamped’ a page that I created & never used for its original purpose. Plus a few hints on how you can use Faber-Castell gelatos to create a background.
Here’s my ‘before’ page.
CREATING A GELATO BACKGROUND
Take a sheet of plain card stock. Coat with gesso, or something similar. I used Matisse ‘Whte’ emulsion, which is similar. What you need is any product that will coat your paper, so when you slosh on a pile of water it won’t turn to mush. I used the white to tone down the colours as I worked with them – that’s the look I was aiming for.
Oh yeah - I keep my gesso in these bottles - easier to work with! Then I work out where my photo will go, mark it with pencil, so I don’t waste putting the color where it won’t be seen.
Next step, choose your colours & simply squiggle them onto your paper.
Put lots on. Then with a water spray [an old mist bottle is the best], spray on a LOT of water. So much that it ‘pools’ on your page.
Next, using your finger, basically ‘finger paint’ it.
Once you’ve done this –working the colours in together a bit as well, add more water. Now tip your paper up & down so the colours ‘run’ together. If you want drips, now is the time to create these.
If there is too much water, simply add more Gelatos at this stage & work them in again. Once you’re happy with the ‘look’, you can leave it as is. Or do this extra step. VERY gently, gingerly almost, using some paper towel, blot the paper. This gives a bit more texture which I like, & softens & blends the colours even more.
That’s it! Let dry. I’m impatient, so I use my old hair dryer to dry my page.
If you find it has curled up, then simply coat the back side with gesso or paint – any wet medium will do. Once it dries, your whole page will be flat. This tip comes from Zeneva Kovic…..& it’s a fabulous one!
So, now I’ve got my paper & the bits from the original page I wanted to add, plus some extras…& I set about making it look decent. Some of the silver doily went under the edges, softened with gesso. I re-jigged the title & added a heart punched from the original paper - stamped, then also gessoed:
This page was for a challenge ‘One Little Word’ in June, where you had to use the word ‘will’…so I stamped that on the background…crookedly, but that was OK…I just made it more crooked ‘til it looked OK! Here's a few more closies:
Hope this tutorial helps you in some small way. For me, best of all, I ‘rescued’ my page & now I’m happy with it!
Happy scrapping ~ Lizzy ♥♥♥
Labels:
backgrounds
,
Design Team
,
gelatos
,
gesso
,
Layouts
,
Lizzy
,
mixed media
,
Off the rails scrapbooking
,
revamp
Thursday, June 12, 2014
Tutorial with Rachael
Are you finding that you have no inspiration to create?
Well we have a video tutorial from Rachael to share with you today.
Enjoy and we would love to see any projects created by watching the video.
Labels:
backgrounds
,
Design Team
,
Off the rails scrapbooking
,
Rachael
,
tutorial
,
video
Sunday, June 1, 2014
More Ways to Use Fabric
We have doilies, backgrounds, flowers and more all using fabric
I have incorporated fabric into my layout by adding gauze and crochet doilies for texture; a fabric covered button; a handmade rolled fabric rose; and a corduroy flower.

I've used fabric to make a flower (top right of photo) and gauze, underneath the top and bottom edges of the photo.
Don' forget for this challenge we are giving you a chance to show case your amazing talents in our
Happy Creating
Labels:
backgrounds
,
Catie
,
Design Team
,
Designer Hot Spot
,
doilies
,
Fabric
,
flowers
,
material
,
Off the rails scrapbooking
,
Rose
,
Sue
Wednesday, May 21, 2014
Layout Tutorial with Jelissa
Hello friends!
I've just come back from a long break in Australia with my family, and I'm really excited to be back here to share a tutorial on how to create textured backgrounds.
Here is the layout:
I used the "Paradiso" collection from Kaisercraft, together with some knick knacks from their various collections.
Some close-ups:
Just love these flowers and how well their colours complement the palette I have chosen.
Creating layers with die-cut elements, chipboards and flowers.
Here's the start-to-finish video tutorial. Hope you enjoy what I have to share with you today!
Jelissa
Labels:
backgrounds
,
chip
,
colour palette
,
Design Team
,
flowers
,
Jelissa
,
layout
,
Off the rails scrapbooking
,
texture
,
tut
Subscribe to:
Posts
(
Atom
)


.jpg)