Showing posts with label Sanna Lippert. Show all posts

Sunday, December 28, 2014

Packaging Transfer Technique by Sanna

Hello there! The other day while I was creating a layout, I finished a sheet of word thickers and was left with a piece of white shiny paper the thickers had been attached to. I also had some ink daubers standing on my table. That moment it came to my mind that I might be able to use the white piece of packaging paper like a craft sheet. So I tried how it would work.

I wiped some dauber ink onto the surface and then pressed a piece of white paper onto it. Worked really well! 

There even was enough residue ink left over to take a second "print". This time the colour was not so strong anymore and you could even see the forms of the thickers peeking thru the ink on the paper - can you see the slight heart pattern on the background?


I even made a third generation background from the same inked area. There the colours and patterns are very soft, but I find it still makes a great background. Since this piece of paper is punched, the ink also seeped into the lines where the words used to be and created additional deco elements. So I fussy cut the heart and used it on one of the cards as an embellishment. 

Then I just glued the pieces on my card bases and decorated them. This is how they turned out:


For this card I used only a piece of that inked paper, stamped with a script stamp over the ink and added some doodling around the edges. I also added a piece of glitter tulle and some leftover butterflies I had punched out previously from other leftover paper pieces. 


This card background is made form the second generation print and I added some faux stitching around the big heart and then drew some additional stitched hearts here and there. After that I added some melted silver crayon droplets and various embellishments. By the way, the flower is punched from paint sample sheet. I used two different colours, layered them over each other and fastened them together with a brad.


This card is made from the first generation print. I have added some stamping, yarn and silver wax crayon as decoration. I also layered some older flowers to a bigger one and added a brad on top. See the white heart in there? that is the one I fussy cut from the sheet :). So I have again managed to accomplish some serious stash busting with these cards. Hope you get inspired and have some fun with your stash!! 


Tuesday, July 1, 2014

New Month, New Challenge.


First I would like to thank all of you our followers, because without you we wouldn't be here and second I would like to thank our amazing sponsors.

From now on we are going to be doing things a little differently around here. We will be having one challenge a month so you will have more time to create. You are able to enter a card, layout or mixed media creation as long as it fits the theme. The design team and admin have been working hard behind the scenes to bring you as much inspiration over the next month as we can. It wont all be about the challenge but we will try to inspire you to create and go Off The Rails.

The challenge for the month is a mood palette and what a gorgeous one it is.


Would you like to see how the Design Team used our mood palette?

Sanna has created a layout which included a photo of her son who just loves dessert.


This month I decided to go 'Off the Rails' (well Off the Page, actually), and I created this sign for my twin boys' bedroom door. (Perfect for my little monsters! hehe)

We have only shown you four of our Design Teams inspiration projects so you will have to keep coming back to see more.


Please welcome our sponsor for the Month
Rachael Funnell

not only is she the sponsor for the month 
but she is also part of our design team
http://awindowtoomyworld.blogspot.com.au/

and what you have all been waiting for a photo of the prize

so many yummy goodies to play with
Good Luck

We have changed the About Us section so can you please follow the link below and have a quick read
http://offtherailsscrapbooking.blogspot.com.au/p/about-us.html

Don't forget to follow us on FacebookPinterest and Twitter to keep up to date with what is going on

Happy Creating

Saturday, June 7, 2014

Use those scraps of fabric and paper!

Hi there, today I´d like to share with you a little step-by-step tutorial on how I added canvas elements to my May "Fabric challenge" layout.


I first took a piece of white old T-shirt and cut some circles out of it.


Then I chose some Lindy´s Stamp Gang spray ink tones and sprayed the fabric circles in different colours.


Then I went along and stamped with a rubber stamps (N* Studio "Wired") and black archival ink over the circles and let them dry properly.


While the fabric was drying I started creating the background for my layout. I first applied some crackle paste thru a The Crafter´s Workshop stencil onto the background paper and let that layer dry.


After the paste was dry I applied some color splatters (using the same Lindy´s Stamp Gang colours like for the circles) onto the background for additional detail.


Then I used the same wired stamp and stamped some images with a grey dye ink onto the background.


I then cut some paper scraps into various sized pieces, inked their edges and glued them on their places.


Now that the fabric circles were all dry I could glue them down on their places. I applied them in clusters and also cut some additional circles out of a piece of residue misted paper (the smaller yellowish circles) and glued those down too.


Then I just used the same yellowish misted paper piece for adding some rub-on details to the page. I first rubbed the words onto the misted piece, outlined them with a black pen and then just fussy cut those.


And this is how the finished layout looks like. I have added some enamel embellishments and chipboard pieces as well as some rub-ons and puffy stickers for decoration. The title is outlined with a black Copic marker. I hope you get inspired to use those scraps of fabric and paper - they make for great additional elements on cards and layouts!! Have fun!

xoxo, Sanna

Saturday, May 10, 2014

Different Ways to Create Coloured Spatters with Sanna

Hi there! Sanna here today. I thought I´d share with you a few ideas how you could create color splatters on your layout. 

You can use a watertank paint brush, regular paint brushes, spray inks, pigment inks, Distress inks and ink daubers for creating splatters. They all create a different look, so it is lots of fun to play with them all. Even PITT artist pens can be used to paint "splatters" :). 

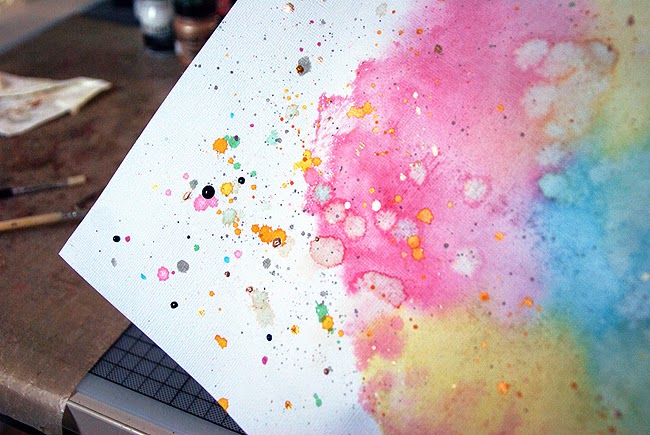
But first I wanted to create a watercolour background and used distress inks for that purpose. I first pressed some red, blue and yellowish ink onto a craft sheet and then sprayed some water over the area. 

Now all I needed to do was to press the paper onto the colored craft sheet and lift it up. I just love this look. It is so easy to make and the results are always a surprise. I then sprayed the craft sheet with some more water mist and lifted it up and let the residue color drop onto the background. As the ink is mixed with water, it will immediately soak into the paper and create watercolour looking splatters. 

Next I took some Hero Arts ink daubers and dabbed some color into an acrylic stamping block. Then I applied some water mist over the color. 

Now all I needed to do was to lift the acrylic block over the background paper and let the wet color drop randomly onto the paper. This being a dye ink, it did not soak into the paper that much and therefore created stronger and more vibrant splatters. 

Another possibility to use the ink daubers is to pick up the color with a water tank paint brush and and then by dabbing the paint brush you can create very fine small color splatters. 

Another possibility is just to directly paint "splatters" onto the paper. This way you get a more controlled look as you can freely choose the place and size of the splatter you want to create. 

Acrylic paints are also great for creating splatters. You can create a much more "bulky"/raised color splatters depending on how thick you leave the paint. I used a golden acrylic paint and mixed it with some water to make it slightly more fluid. Then I just grabbed a regular paint brush (well, actually two) and dabbed the paint brushes onto each other over the paper. 

I really like the look of these golden textured splatters in between the watery splatters. It created a nice contrast. 

You can even use paint markers to create a splattery look on your layout. I added some random blue and pink "splatters" here and there with a PITT artist pen (Faber-Castell). 

Then there are many sorts of spray inks and pigment ink on the market that can also be used to create color splatters. My all time favorite one for black spaltters is Glimmer Glaze "oil slick" by Tattered Angels. I just love the nail polish kind of shiny, sharp look it creates on a layout. My favorite white color is the Liquitex Ink! Titanium white. 

This is only a small selection of products, just something I had at home. There are naturally many more product possibilities out there in the market that can be used for the same purpose. 

This is how my finished layout looks like. 

 And here are some close-up photos of the splatters I created.

 I hope you have enjoyed this little step-by-step and will take a second look at your products and try out some color splatters on your next artwork :).


Happy scrapping and see you soon!
xoxo, Sanna