Showing posts with label candy. Show all posts

Friday, March 9, 2018

Card tutorial with Candy

Hi everyone Candy here

Today I have created a card for you all using the moodboard
Black, white, one other colour and stitching

Image may contain: 1 person, smiling

I have used a 6 x6 inch easel card for the base.
There are two layers of coloured papers on the base one will measure
5 7/8 x 5 7/8 inches and the other 5 3/4 x 5 3/4 inches.
Use an edge distresser and distress around the edges of these two papers.
Tape the 5 7/8 inch square to the front of the cardstock base with tape
 then using foam tape under the 5 3/4 inch pattern paper square.


I have cut 3 rectangle pieces at different widths and then cut a V at one end.
Distress around each of these and tape down.
Add the pink heart doily, flowers, pearl leaves and sprays 
and the Happy Birthday sediment.
Now for the base of the card cut two pattern pieces one at
4 1/2 x 2 1/2 inches and the other at 4 1/4 x 2 1/4 inches.
Distress around the edges as well.
Tape down the smaller to the bottom paper piece
then using foam tape tape this to the card base towards
the front of the card.
Cut a rectangle of black cardstock at 4 x 1/2
 and another using white at 3 3/4 x 2 1/4 inches then cut a V in one end
 and distress around the edges and tape down onto the pattern paper 
then add your flowers.
I used a black pen to add some false stitching lines to the spotty
papers.

Thank you for visiting
Candy Chelepy
2018
Design team


Tuesday, January 9, 2018

Scrapbook layout with Candy

Happy New Year everybody hope you all had a
wonderful Christmas.

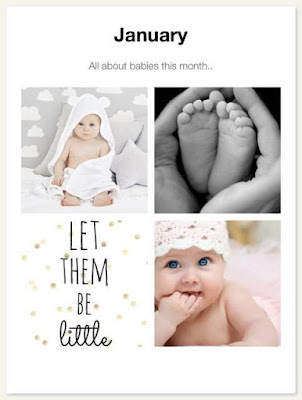
This month's inspiration moodboard is "All about babies"
and I have plenty of photos of my cutie Granddaughter Zarna

Here is the moodboard for inspiration

January Challenge

Today I have created a layout using some of my stash


leftovers from a kit I bought from Kitaholics Kits.


I used the polka dot paper for my background and tore the brush paper
into four pieces different sizes.
Tape these onto the base in layers and ruffle up the edges
I double matted the photo it measures approx
3 1/2 x 4 inches.
Tape all the emphemia around under the photo
and add the hearts into the layers of the 3 papers also add your puffy stickers and 
the word Beautiful and flowers.


I used 3 wooden butterflies and I covered them with some mousse
using aqua then the pink around the edges.
I also went around the edges with a gold and then a black gel pen.
Also using the gel pens go around the edges of the base paper 
and all the emphemia  pieces.
Cover your photo with a scrap of cardstock and 
splatter with some black ink and a fan brush.


Products used
My minds eye
- Blush, polka dot and brush papers
- emphemia
-Journal cards
- Puffy stickers
Thickers gold letter stickers
Kaisercraft Be you wooden butterflies
Nuvo embellishment mousse
- Pheony pink and Aquamarine
Black ink and a fan brush
Edge distresser
Gold and black gel pens

Thank you for visiting
Candy Chelepy
2018
Off the Rails DT


Thursday, November 9, 2017

Altered frame with Candy

Hello everyone.

Welcome to another month full of creativity.
Today I have altered a 10 x 12 inch canvas and an old plasic frame
I had in my stash.

I have created this frame for my mum for Christmas,
I am sure she will love it.


Here is the mood board I got my inspiration from


I firstly covered the canvas with white gesso and also the frame
as it was blue I had to use a few coats to cover it.
When the canvas was dry I glued on the 3 pieces of lace using matt medium.
Then added some spray, only a light cover.
I then glued on the frame and used clamps to hold until it dried.
I waited overnight so it was really dry.


Add the flowers with a strong glue.
Then I added some white gesso and prills
to the edges of the flowers and leaves.


The photo measures 3 x 5 inches
I sanded around the edges then addes some
white gesso with my finger then more prills.
I cut 3 lace flowers in half then glued them under my photo.
And I raised my photo to make it pop.


Products used
10 x 12 inch canvas
Old plastic photo frame
White gesso
Matt medium
450 glue
Lace and flowers from The Vintage Chics
Lindy's - Chateau  rose spray
Mini prills - silver and pearl

Thank you for visiting

Candy Chelepy
2017 Design Team


Saturday, September 9, 2017

Steampunk Cards with Candy

Hello hello everyone.

Today I have made three male cards.
When I saw this moodboard I thought yes steampunk.


This what I have created


I am just going to feature one card for you
with the instructions on how to make it.


This is a 6x6 inch easel base made from cream cardstock
  1. Cut a piece of the pattern paper at 5 7/8 x 5 7/8 inches then a piece of the cream cardstock at 5 1/2 x 5 1/2 inches then put this through a cog embossing folder. I very lightly went over with some brown ink to make the cogs stand out a little more. Tape both of these to the front of your card base.
  2. I have used the collectable and just placed them where I liked them. Some are raised and some are flat. I also added a flair button.
  3. Now for the bottom. Cut a piece of the cream cardstock at 3 x 5 1/2 inches and also a pattern paper at 2 3/4 x 5 1/4 inches. Tape these together and use some faom tape to raise up. I added a sticker from the sticker sheet from the same range. 

Products used
Cream carstock
Kaisercraft Barbers shoppe collection - Comb, Razor and aftershave papers
- Collectables and sticker sheet
Burlap trim
Cog embossing folder
Funky flair studio flair buttons

Thank you for visiting
Candy Chelepy
2017
Design Team


Monday, July 10, 2017

July Scrapbook layout with Candy

Welcome welcome ladies.
This month we have a great moodboard challenge.


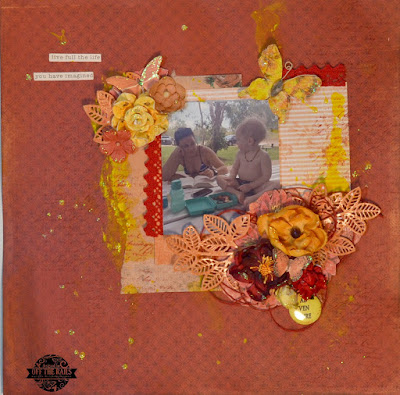
You could create with african animals,
zoo or just do the colour challenge, which was what I decided to do.
I have used orange, red and yellow on my layout.


This took me right out of my box as orange is not a favourite colour of mine
and I struggle to use it. 
 I decided to use a very old Kaisercrqaft Collection
Curiousity.
 I cut three papers at different sizes, then taped them to the background.
I then covered the background with clear gesso
 as I wanted the splatters of yellow and my stamping to stand out. 


My photo is raised with foam tape, adding the red lace under the photo
and up along the top right side of my paper.
Using a leaf die I cut out three leaves, one of these are cut apart.
I added collectable flowers under the flowers then layered
everything else. Adding the flair button.
I covered my photo and splattered with the yellow die
 then stamped with a script stamp and red ink pad 
to finish off my page.


Products used
Kaisercraft Curiousity Collection
- unique paper
- collectables
- 6 1/2 x 6 1/2 inch paper pad
Red twine and lace
Prima and Kaisercraft flowers
Creative expression faux quilled leaves die
Funky flair studios flair button
Red ink pad and script stamp
Liquitex yellow ink
Crystalina glitzin glamour


Thank you for visiting

Candy Chelepy
2017 DT


Tuesday, May 9, 2017

Scrapbook layout by Candy

Welcome everyone Candy here with another project for May.

Wow how the months are flying by, 
it will be Christmas before we know it.
The layout I have created using the Kaisercraft Ubud Dreams Collection.
I thought this would suit the mood board perfectly.


This is a photo of my daughter Tracy fishing.
This month we encourage you to use feathers on your project and I thought
the feathers would soften, making it a bit more feminine.


Here is the moodboard


Thank you for visiting
Candy Chelepy
2017 Dt member


Thursday, March 9, 2017

Scrapbook layout tutorial with Candy

Welcome again to another month

My layout today is made from a kit I bought from Kitaholics.
And yes the photo is off my grand daughter Zarna Rose.


The heart was printed on the pattern paper.
So I cut it out carefully with a craft knife. I used a needle and
carefully poked some holes around the heart design, 
Then hand sewed around the heart with the twine.
I also added some thin gold washi tape. 
I cut a piece of cardstock and taped it to the back of the background piece to fill the heart hole shape.
Using foam tape, tape the heart to the background. 


I have added flowers, papers and embellies to the layout and also went around using my 
finger with gold paint and then added some black ink to the edges as well.


Products used

White cardstock
Simple Stories Love and Adore collection papers
Pink and white twine
Thin gold washi tape
Black ink pad
White doily
Chipboard frame
Kaisercraft gold paint
Prima flowers
Wood veneers
Flair button
Puffy stickers

Thank you for visiting

Candy Chelepy
2017 design team


Monday, January 9, 2017

Notebook cover tutorial by Candy

Welcome everyone to another month full of creativeness..

This is my first tutorial for the year and there will be many more to come.
I have made for you all today a covered note book, it is 8 1/2 x 6 inches


We had a mood board this month.
 We had to choose which colour scheme we liked and used it with white only. 
So this is what I have come up with.
 I got my hands very dirty I chose pink of course.


As I said I started with an ordinary note book.
 I cut a piece of patterned paper to 10 1/2 x 12 inches and then scored it at 7 and 7 5/8 inches 
this makes it easier to bend around the spine of your book.
I have used some 3/4 inch double sided tape and taped it to the wrong side of your paper, making sure you put plenty on as being a note book it will be opened and closed a lot and we don't want it to fall apart. Then lay your paper on your table and place the book on top of it lining up the score line and the spine of your book. Give a gentle rub all over to make sure it is well stuck down.


The paper is not long enouch to completely cover your back so we have to cut another piece at
 3 x 10 1/2 inches then score at the 2 inch mark. Then place your tape on the wrong side and tape to your book. I then cut another 2 pieces of pattern paper to cover the inside of the book. 
This will measure 5 1/2 x 8 1/4 inches tape this well to the inside of the covers of your book.


I then painted the front of my book with white gesso let it dry a little and using a baby wipe, wipe off the gesso leaving a little so it looks a bit shabby.
Using some light modeling paste and a floral mask, cover the front of the book, let dry.
I then went around the edges of the book with some pink chalk ink , then glued on the flowers, lace, feathers and coloured some white gauze with some pink spray and placed it around and under the flowers. After doing this I used my finger and some white gesso and went around the edges of my book and all over the flowers and leaves, just to dull the colours.


Thanks you for visiting
Candy Chelepy
2017 DT member


Friday, January 15, 2016

January 2016 Mid Month Reveal

Welcome to the Mid Month reveal. 
Here is a sneek peak of Luciana's layout please come back on the 17th to see the full layout and tutorial


Dont forget about our sponsor this month 

Monday, December 28, 2015

Double the fun...


Firstly we have to say a very sad goodbye to Heather McMahon, Heather's work has been much appreciated and loved here. Here is her last tutorial. But double the fun could only mean one thing.... We have another tutorial, spoilt much!! 


Hello - it's Heather McMahon here with my last Off The Rails post. I have enjoyed my time here and I'd like to thank Amanda Sousa so much for having me in her team.

Today I want to show you how you can use up leftover sprays. Firstly, here's my layout:


This is my niece's gorgeous kitten, Billie, who has since turned into an equally gorgeous cat. Any kitten that happily spends Christmas Day wearing tinsel has to have character!
Here's how I used my leftover spray.....
Whenever you spray through a stencil, keep a sheet of white (or coordinating coloured) cardstock nearby. After spraying, flip the stencil over and stamp it onto the cardstock. I have only used one colour and stencil here but you can use multiple colours and multiple stencils on the one cardstock for easy and unique backgrounds.
Here's how I then created my layout.....
Sponge pink and blue ink through a Dusty Attic stencil.


Paint the chippie pieces.


Mount chippies, paper and photos onto the page.


Tuck some gauze behind the photo, add a tag and thread and the first part of the title.


Add a strip of paper at the top and glue a line of beads underneath. Glue scattered beads in place. Add the chippie title, a butterfly and sequins for a bit more Christmas bling. Don't forget to add your journalling!
Here are some closeups.....


Here's the stunning mood board that I used for this project. I love that it's Christmassy without using traditional Christmas colours. I hope you can join in this month!


Thank you for sharing this journey with me. Wishing you all the very best for Christmas and for a safe and happy 2016.


Happy scrappin'!


Heather McMahon


 Hello everyone.

Candy here with you all once again bringing you another layout. I have been trying to use up my stash and also my scraps. I am sure we all have plenty of both. I have each collection in a bag to keep them all together. I have made a simple layout for you all today using the lovely Kaisercraft Silver Bells collection.


I have cut 1 1/2 inch strips and placed them under my photo along with a 4 x 4 1/2 inch piece as a photo mat. I also used a strip of the pink scallop from the sticker sheet and glued them all down well. The photo is raised. I cut out 11 baubles and taped some flat and others on foam tape. 
I added a tag under the photo and cut out a white tag which I have written my journaling on.


As you can see I have added a non Christmas photo but I think it looks pretty good. I used some metal pieces from my stash and painted them with gesso then went over with some pink chalk ink.  And to give it a bit of bling added some glue here and there and used some sterling glass glitter.
The journaling reads...
A girl and her best friend, big sloppy licks and kisses


The mood board for December


Thank you for visiting

Candy Chelepy
2015 Design Team
 Off the rails Scrapbooking