Showing posts with label Wendy. Show all posts

Sunday, December 20, 2015

SIMPLE HYBRID CHRISTMAS CARD


Hi, 
it’s Wendy here today to share with you how I made a quick, simple hybrid (combined digital and traditional) Christmas card.


I used this month’s “traditional colours” mood board as inspiration for my card.


First I designed the white panel on the front of the card digitally using some favourite Christmas elements. You could use any pictures on the panel, or even a written quote. I then printed out my design twice on white card stock.


I cut out the first panel and stuck it in position on my cardstock base. My base is 22cm x 15cm, scored in the centre so that the folded card measures 11cm x 15cm. You can make the card any size you want but I made mine this size because it fits in a standard size envelope easily.
The second panel print I used to make some 3D embellishments. I cut out the “HO HO HO” banner, Christmas stocking and the gnome – all very straight forward cutting. I then used foam dots to adhere these embellishments in place over the base. This is what it looks like in 3D.
As you can see, I have also added some traditional embellishments in the way of sparkly gold stars and red bling dots.
Hope I’ve given you some ideas and thanks so much for dropping by.
Cheers.

Wednesday, November 18, 2015

Quick Baby Wipe Technique

Hello Scrappy Friends

It's Wendy back again. I know I said last months tutorial was my last, but I couldn't stay away and decided to share with you a card I made. This really is my final project for Off The Rails so I hope you like it.

I call it the "quick" baby wipe technique because there's no stamping or fussy cutting involved. This is the card I created using the "quick" technique and it took me less than 20 minutes.


All you need to make a similar card is cardstock for the base, cardstock/paper scraps, your favourite die, embossing folder (optional), and a few different colour inks.

Step 1

Lay your baby wipes, several layers thick, on a suitable working surface. I used a plate because it was easy to clean up and it protected the surface underneath.


Step 2

Dab (do not spray) your ink colours on to the baby wipes. I wouldn't use more than three different colours because it tends to get too murky. Wait a little while until the colours blend together. I did this twice with contrasting colours.


For this I've used Tsukneko ink in Tangerine, and Kaiser Mists in Antique Gold and Yellow.


For the second one I used Tsukneko ink in Peony Purple, Cerulean Blue, and Tuscan Beige.


Step 3

Normally at this point you would press your stamp on to the baby wipes, using them like a stamp pad, then stamp the image on to your cardstock for fussy cutting later. I'm not really a confident stamper so I use the inked baby wipes to pattern my plain cardstock. This is as simple as pressing your cardstock down on the baby wipes. This is what mine turned out like.


Step 4 (optional)

After your newly patterned cardstock is dry, emboss a pattern on one of the pieces of cardstock. I used We R Memory Keepers feather embossing folder.


Step 5

Ink the edges and attach to the base of your card.


Step 6

This is where you save more time by not having any stamped images to fussy cut. Use the second piece of inked cardstock to die cut your favourite image. To keep in theme, I used a Kaisercraft feather die - much faster than fussy cutting!


Step 7

If you want more dimension and contrast, ink the edges of a contrasting piece of paper or cardstock and glue it to your card.

Step 8

Glue the first die cut in place.


Step 9

Finish off your card by attaching the second die cut with dimensional tape and adding your sentiment. I also added some butchers twine to my feathers. You could add anything you want at this stage.


I hope you enjoyed my hints, and thanks for dropping by. 
Happy scrapping.

Sunday, November 1, 2015

Recycle or Upcylce November Challenge

Welcome to November, this month not only do we have one of our fantastic mood boards to inspire you with, but also we want you to either recycle or upcycle something. Do you have a cereal box just about to be thrown in the trash or an old card or even some advertising material from your mail box? Maybe you have a background from a layout, a card or a mixed media canvas that you started but you only got so far before you decided that it wasn't heading in the direction you want. Now is the time to use these things and do what the name of our blog suggestions go Off The Rails and create something that you never dreamed of creating. 


Is the mood board giving you lots of ideas? Lets get those thoughts and idea flowing even more and see what the Design Team from created.


Sue


Sneak Peek come back on the 24th to see the whole design


This month we welcome back Imaginarium Designs as our monthly sponsor.


Friday, September 18, 2015

Make Something Useful For Next To Nothing

Making Something Useful For Next to Nothing

Hello, it's Wendy here to show you how I made this guest book for my niece's recent birthday. I chose black, silver and pink because they were the colours of the decorations at her party.


It cost around $4 and scraps from my stash to make this and my niece loved it. First I started with a water colour sketch book.


I chose this because it's acid free, which gives the flexibility to add photos to go along with the guests' autographs and memories. The problem with this book though was that it had a plastic, see through front cover and a brown cardboard back cover.  So, I covered the front and back with black card stock.


This is the front cover. A 12x12 piece of black cardstock, cut like this, was a perfect fit. I did this for the back cover too. I glued the flaps to overlap and provide extra strength - effective, but not very pretty. So I covered the inside joins with some glitter patterned cardstock, on the inside of the front and the back covers, to give a nice finish. 


Next step, I used Washi tape to decorate both covers, and provide extra strength.


Then I glued two layers of organza ribbon and a layer of glitter tape across the front and back covers like this.


I extended the ribbons so they could be used as a tie to keep the book closed.


Then I started to add the embellishments. Firstly a metal embellishment, topped with a flower, for both the front and the back.


That's the back finished, now for the rest of the embellishments on the front, including a photo of the guest of honour.


My niece loves bling and champagne, so I took my lead from there. I had metal champagne embellishments and bling in my stash .... so no problem. The final bit of  decorating was to pretty up the spiral spine. This I did with pieces of ribbon in the black, silver, pink colour palette.


The very last step was to spray the front and back covers with a protective cote of fixative. I used Crystal Kote in matt.

I hope I've given you some ideas. Thank you for stopping by.

Cheers
Wendy :)

Tuesday, September 1, 2015

Spring Has Sprung

Here in Australia it is the first day of Spring, we are yet to feel it in Melbourne but it is on it's way I am sure (and hoping). Because it is the first of the month that means we have a mood board challenge. It is moody, dramatic and the design team have done an amazing job with it.


We would like to welcome back 2Crafty Chipboard who are our sponsor this month. They are offering the lucky winner a mixture of their
 gorgeous chipboard. Who doesn't love chipboard.


Please Note our sponsors this month, 2Crafty, will post Australia-wide only.  International entrants, please note that if you enter, we have to assume that in the event you are chosen as a winner this month, you are prepared to pay the postage for your prize.

Saturday, July 18, 2015

Digital Mixed Media Layout

Digital Mixed Media Layout
Hello Scrapbooking friends,
It's Wendy here today to show you how to create a digital mixed media layout. It's all a matter of building up the layers, just like you would with a traditional layout.
Earlier in the month I did a layout based on the first inspirational mood board. Because both mood boards are so delicious, I decided to base my tutorial on the second one. Just to refresh your memory, this is the second mood board:

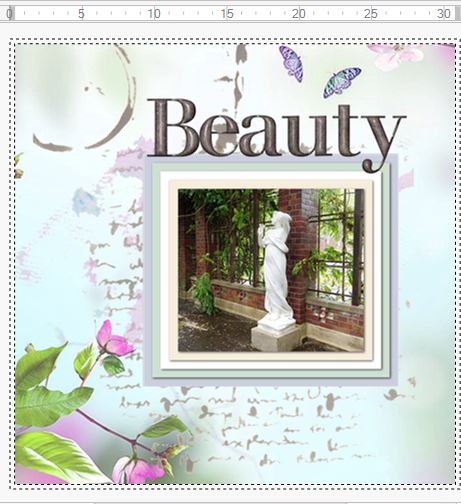
This mood board is so soft and pretty and this is what it inspired me to do:
All of the elements on this page were created by me using different methods, (e.g. stamping, spraying, stencilling),  just like you would if you were creating a traditional layout.
Some time ago, I did a tutorial on how to create digital embellishments and it is these techniques that I've used to create the elements on this page. I've loaded that tutorial on to my blog and here is the link Creating Digital Embellishments. Now here are the steps involved in creating this layout:
Step 1: Background
I chose this ready made paper because it has a soft look, like the mood board. You can make your own paper, once you know how to layer your artwork/elements. For simplicity, I used a readily available paper for my background.
Step 2: Add some water colour
I added these soft water colour splatters by splattering water colours on a page (traditional style), scanning the page, loading it into my digital software (you can do this in whatever software you use), and cutting away the background as explained in the digital embellishment tutorial.
Step 2: Add some stencilling
I've used a script stencil and a coffee stain stencil and I've added them exactly the same way I added the water colour in Step 1.
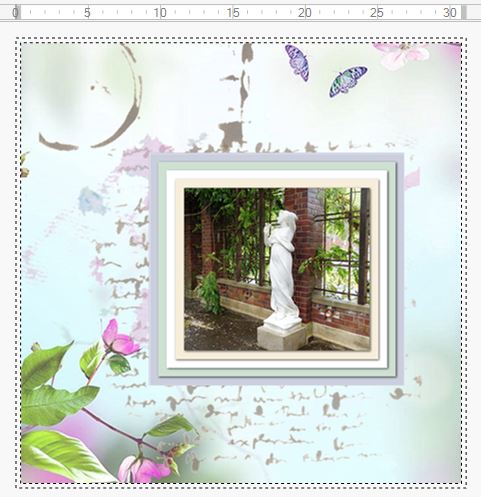
Step 3: Add the photo to make sure it's balanced
At this stage you can move everything around to make sure it fits. I've added several mats to my photo, in the mood board colour palette, so that it matches the background and helps the photo to pop.
Step 4: Adding a title
When I was fairly happy with the placement of my photo, I added a title. I didn't design this title myself, I used the alphas I already had in my digital artwork stash. I could have just as easily used one of my favourite fonts.
Step 5: The final embellishments
As you can see, I've added flowers as my final embellishments. This step was really special for me because I used photographs of some of the flowers I received for Mother's Day. After taking pics of my flowers I loaded them into my digital software and cut away the background just like in Step 1 and 2, and as described in the digital embellishment tutorial.
It took a fairly long time to do this layout but the process was so satisfying. And, the end result makes me happy because the photo was taken at the Wintergardens in NZ, a place I loved visiting. Also, I have incorporated my Mother's Day flowers and I still have them in my personal artwork file to use over and over again.
If you want to ask me any questions please feel free.
Thank you for dropping by.