
Hi there! Sanna here today. I thought I´d share with you a few ideas how you could create color splatters on your layout.

You can use a watertank paint brush, regular paint brushes, spray inks, pigment inks, Distress inks and ink daubers for creating splatters. They all create a different look, so it is lots of fun to play with them all. Even PITT artist pens can be used to paint "splatters" :).

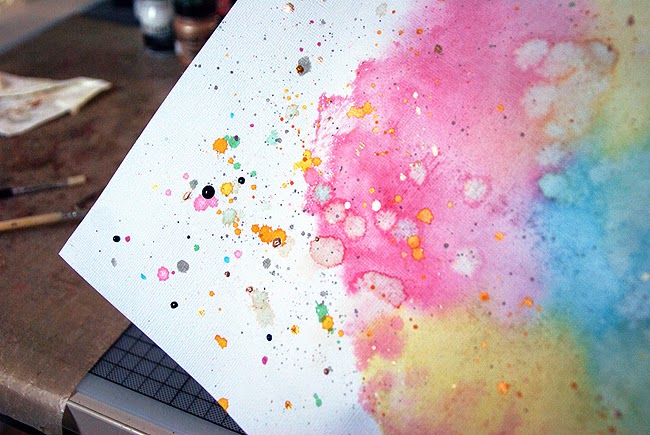
But first I wanted to create a watercolour background and used distress inks for that purpose. I first pressed some red, blue and yellowish ink onto a craft sheet and then sprayed some water over the area.

Now all I needed to do was to press the paper onto the colored craft sheet and lift it up. I just love this look. It is so easy to make and the results are always a surprise. I then sprayed the craft sheet with some more water mist and lifted it up and let the residue color drop onto the background. As the ink is mixed with water, it will immediately soak into the paper and create watercolour looking splatters.

Next I took some Hero Arts ink daubers and dabbed some color into an acrylic stamping block. Then I applied some water mist over the color.

Now all I needed to do was to lift the acrylic block over the background paper and let the wet color drop randomly onto the paper. This being a dye ink, it did not soak into the paper that much and therefore created stronger and more vibrant splatters.

Another possibility to use the ink daubers is to pick up the color with a water tank paint brush and and then by dabbing the paint brush you can create very fine small color splatters.

Another possibility is just to directly paint "splatters" onto the paper. This way you get a more controlled look as you can freely choose the place and size of the splatter you want to create.

Acrylic paints are also great for creating splatters. You can create a much more "bulky"/raised color splatters depending on how thick you leave the paint. I used a golden acrylic paint and mixed it with some water to make it slightly more fluid. Then I just grabbed a regular paint brush (well, actually two) and dabbed the paint brushes onto each other over the paper.

I really like the look of these golden textured splatters in between the watery splatters. It created a nice contrast.

You can even use paint markers to create a splattery look on your layout. I added some random blue and pink "splatters" here and there with a PITT artist pen (Faber-Castell).
Then there are many sorts of spray inks and pigment ink on the market that can also be used to create color splatters. My all time favorite one for black spaltters is Glimmer Glaze "oil slick" by Tattered Angels. I just love the nail polish kind of shiny, sharp look it creates on a layout. My favorite white color is the Liquitex Ink! Titanium white.

This is only a small selection of products, just something I had at home. There are naturally many more product possibilities out there in the market that can be used for the same purpose.

This is how my finished layout looks like.

And here are some close-up photos of the splatters I created.

I hope you have enjoyed this little step-by-step and will take a second look at your products and try out some color splatters on your next artwork :).

Happy scrapping and see you soon!
xoxo, Sanna
Fabulous hints, tips & ideas...some I'd forgotten I even knew, if that makes sense....thanks SOO much for sharing & your page.....looks TOTALLY brill:):):)
ReplyDeleteVery fun tips and tricks. Love the page.
ReplyDeletethanks, girls!!!
ReplyDeleteI *love* this - thank you for the fabulous step-by-step!
ReplyDeleteThis is awesome! So much great info and terrific tutorial.
ReplyDelete