
Hi Sandi here today.
This my first tutorial so I hope you find it helpful and it inspires you to try something a little different.
I have been experimenting with using serviettes in my layouts lately after a friend of mine gave me a bag she had given me for Christmas ( coffee and cake serviette jute bag). I thought I could use this idea and apply my love of scrapbooking to it and this is what I came up with.

What you need to start: A jute bag from a supermarket, serviette, Mod Podge, paintbrush, large plastic bag with a flat board (I used a A4 cutting mat) to place in the bag to protect sides from sticking together.


Separate the serviettes layers, you only need the top layer.

Use a paintbrush to brush a line of mod podge over the jute under the serviette, carefully brush mod podge over the top following the section you have already done underneath using a light strokes. Holding up the serviette continue to brush mod podge under and then lower to brush more over the serviette ( moving the brush towards top edge works best).


Continue with mod podge until serviette is totally covered. Remove the plastic bag ensuring bag stays open while you leave the bag to dry; a heat gun can speed up the process.

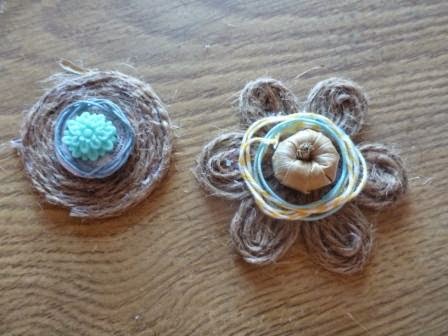
While you wait you can make some jute flowers to decorate the bag later. I made 2 different flowers. I started by using a circle punch to cut out 3 circles from card stock and glued them together. Then using a hot melt gun I glued the end of a ball of jute string to the circles centre, then placed spots of glue to anchor the string as I wound the string around itself until circle was covered.


The daisy flower also used the same circle base, this time I used 6 pieces of string to make loops, and then filled the loops in with smaller loops until all petals were filled. Any pieces of the card that could be seen between the petals were cut away.


I used a cardboard button to put a Kaszazz flower brad onto and repeated the same for my first flower and glued waxed cotton to finish off the flower centre. The daisy centre was decorated with a knot that had fallen off my bamboo leaf bag and to tie the flowers together with the serviette I used yellow striped cotton from Mystical scrapbooks and waxed cotton from Kaszazz.
Now back to the bag. Using Mont marte modelling paste and my favourite mini diamond stencil (Balzer designs) I used a spatula to place dimension to the bag.


I mixed into a Mini Mister (Kaszazz) Dylusions ink spray 'white linen' and 'cherry pie' to make a pink ink spray and 'white linen' and 'vibrant turquoise' to make a mint ink spray. I sprayed these over the modelling paste when it was dry.

On one of the white layers of the serviette I removed I stamped my Kaszazz 'dream, inspire, imagine' with StazOn ink and then used the distress inks 'squeezed lemonade', 'stormy sky' and 'peeled paint' to add colour. I then used the same technique with the Mod Podge to add it to the surface.

When it was all dry I hot melt glued the flowers I made on, a few extra pieces I found in my stash including wood leaves, butterfly and antique flower. I then added some washi tape, blended some vintage photo distress ink over the mini diamonds to soften the white against the jute and then a few splats of black paint to finish it off.


I had a great time experimenting with my scrapbooking techniques on a new medium.
I hope I've inspired you to try something different. Thanks for visiting my tutorial and hope you take the opportunity to check out the talented design team on Off The Rails Scrapbooking blog.
I hope I've inspired you to try something different. Thanks for visiting my tutorial and hope you take the opportunity to check out the talented design team on Off The Rails Scrapbooking blog.
oooo Great inspiration. I love mixed media you made it less scary.
ReplyDeleteThis looks amazing! I've mod-podged napkins to acetate before, and onto cardstock, but this technique is brilliant! Thanks for the fabulous tutorial.
ReplyDelete