It's my time to share another tutorial for Off the Rails Scrapbooking blog today!
My project, a Family altered frame inspired by this beautiful and fun mood palette,
was revealed on the June 15th mid-month DT reveal.
was revealed on the June 15th mid-month DT reveal.
I will attempt to show you in pictures how I went about creating this mixed-media project.
I started with a wooden frame with a burlap canvas bought at my local Dollar store
then I prepped with 2 coats of transparent gesso.
I started with a wooden frame with a burlap canvas bought at my local Dollar store
then I prepped with 2 coats of transparent gesso.
I then wanted to add texture to the frame so I painted it with
Ranger Distress crackle paint and heated it with a heat gun to dry.
This is the beautiful crackle effect it produced.
Next came the burlap canvas' turn to get transformed,
starting with a thick coat of Tan acrylic paint in order to cover all the black wording
and decors, not that I didn't like the existing quote. I just had other plans for this frame!
At first, my plan was to create a golden tan backdrop for my frame,
but then I got inspired by this deep shimmery red Silks acrylic glaze, close to the
shade of red in the mood palette, so I started covered all of my frame with it.
You can't quite see it on this picture, but you can still see a faint touch
of crackle on the frame underneath all that red!
I figured at this point that my frame needed even more sparkle
so I sprayed on lots of Heidi Swapp gold Color Shine.

While my heavily coated frame needed a little time to dry,
I started working on the different pieces of chipboard I wanted to use as decor.
I simply coated them with Folkart metallic black acrylic paint.
With a little help from my heatgun once again, I made sure that my frame
was completely dry before sticking down the chipboard with glue dots and 3D foam squares.
I so loved the quote on the mood board that I wanted to use it word for word.
Combining different style and brand chipboard, I recreated the quote
and added this beautiful family chippies from 2Crafty Chipboard.
Here, you see that I got a little crazy once again with the Heidi Swap gold mist,
this time on the black chipboard so that every piece now has a golden shimmer to them.
Now came my favorite part of any project... picking out the flowers!
I stayed pretty true to the color palette of the board, adding fiery red,
vividly blue and golden blooms adorned with deep green silk leaves.
I added a bit more texture by lining up some bling on the frame.
After a few more sprays of gold Color Shine, I lightly dabbed some more shimmer,
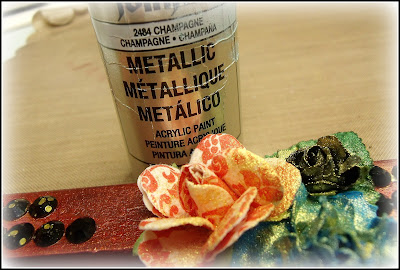
using Folkart Metallic champagne acrylic paint over the entire frame as well as embellishments.
Now let's take a look at some close-ups!
Now you've seen the process of turning a $1 frame into a...
hmm... rather costly, but still PRICELESS work of art. hehehe
Hope you were inspired to delve into some mixed media creativity of your own!
If you like my work, visit me on my blog at Scrap-Utopia! :)
hmm... rather costly, but still PRICELESS work of art. hehehe
Hope you were inspired to delve into some mixed media creativity of your own!
If you like my work, visit me on my blog at Scrap-Utopia! :)


Great project! Love how this all came together!
ReplyDeleteWow, Nicole. You have such a knack for seeing things and turning them into art! I'm inspired to look around my dollar store very differently from now on!
ReplyDeleteBeautiful project!!! Thanks for sharing!! xoxo
ReplyDeleteLooks fabulous....LOVED your step by step!!
ReplyDelete