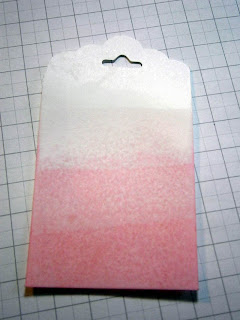
Today I have a fun technique for you - Dip Dying.
What is Dip Dying I hear you say! Well it simply is mixing the dye from your mists or ink refills with water and colouring embellishments or whatever with it. It is so much fun, and maybe a little messy too...lol.
I have a fun little twist on it to - Ombre! It's not as hard as you think. So let's get started.
You will need an embellishment, your ink and a bowl of water. I used a tag for my tutorial.
Then you add some ink to the water, but just a little bit to start with as we want to make a pastel version of the colour first up. Now dip your embellishment to where you want the lighter colour to be. Remember that if you are doing ombre like me here, you will need the lighter colour cover the majority of your embellishment.
You don't need to hold it in there long. I only held it maybe for a couple of seconds, but I was using cardstock so it would depend on how absorbent that item was you were using.
Let this dry or zap it with a heat gun, because if you are impatient like me, you are going to want to get onto the next step...lol
Now add more ink, but this time don't dip your embellishment up so far. You can see this time I just dipped my tag in half way.
And repeat the process with more drops of ink again. And for the final colour I only dipped the bottom of the tag.
Just so you know I was using Strawberry Slush re-inker from Stampin' Up! and for the lightest colour I added 4 drops, then doubled it for the next colour, and doubled it again for the final colour. Actually I didn't measure exactly...lol...but that's what I was trying to do..lol
This is the tag that I ended up with. The ombre and colours are so subtle, but if you wanted stronger colours just add more ink.
And this is the final tag. I also dipped the very tip of the roses into the final ink mixture. I think this will end up on a card some day soon.
I hope you have enjoyed this tutorial and have a go at it. We would love to see what you do, so show us on our Facebook page.
Thanks for visiting today.
Cheers,
Narelle


That looks wonderful!!
ReplyDeleteThat looks fantastic....what a great & EASY thing to do....love the flowers, too. Thanks for sharing:):)
ReplyDeleteooooo i love that hombre look.
ReplyDelete